Chapter 3 of 13 · Basics · 8 min read
White Balance and Color Temperature
White balance is the correction that makes neutral things neutral. When it is right, white paper looks white, grey concrete looks grey and skin looks like skin; when it is wrong, the whole picture takes on the colour of the light it was filmed under. Because every later decision, from a creative look to matching shots, assumes a neutral starting point, it is usually the first colour correction in a grade.
If you only need to remove a cast, fix white balance in a video does it in one click. This chapter goes further: what colour temperature and tint actually are, why cameras get them wrong, how to read a cast on the Parade, when the Offset or Gain wheels do a better job than Temperature, and what to do when one shot has two kinds of light. The demo footage is chart-warm-cast, the test chart lit by tungsten.
Video guide
White Balance with Pick White and the RGB Parade
Chapters
Colour temperature and tint
Colour temperature describes the colour of light on a line from warm to cool, measured in kelvin (K). The scale comes from physics: a perfect black body heated to about 2,000 K glows orange, around 5,500 K it glows roughly white, and hotter still it turns blue. Candles, tungsten bulbs, the sun and the open sky all sit close to that line, which is why most casts are simply “too warm” or “too cool”.
| Light | Approx. temperature | On a daylight setting |
|---|---|---|
| Candle, firelight | 1,800-2,000 K | Deep orange |
| Household tungsten, warm LED | 2,700-3,200 K | Orange-yellow |
| Sunrise, sunset | 2,500-3,500 K | Golden |
| Midday sun | 5,000-5,600 K | Neutral |
| Overcast sky | 6,500-7,500 K | Slightly blue |
| Open shade, blue sky only | 8,000 K and above | Clearly blue |
Note the inversion that confuses everyone: a camera set to 3,200 K expects warm light, so it adds blue to compensate. Lower kelvin settings on a camera therefore make the picture bluer. In the studio there is no inversion: Temperature moves the picture itself, positive towards amber and negative towards blue.
Tint is the other axis. Fluorescent tubes, cheap LED panels and some sodium and mercury street lights emit an uneven spectrum that sits off the black-body line, usually towards green. No amount of warming or cooling removes that; Tint, which runs from green to magenta, does.
Why cameras get it wrong
Your visual system recalibrates to the light in a room within seconds. A camera has to estimate it from the picture alone, and automatic white balance relies on assumptions that are often false:
- That the scene averages out to grey. A green lawn, a red wall or a blue swimming pool drags the estimate towards the opposite colour, so the camera adds magenta to grass and cyan to the red wall.
- That the brightest area is white. At sunset the brightest area is the golden sky, so the camera neutralises the very warmth you wanted to keep.
- That there is one light. A face lit by a window on one side and a lamp on the other has no single correct balance.
- That the light stays the same. Walk from indoors to outdoors and the camera re-guesses mid-shot, so the colour drifts over a few seconds.
Fixed presets avoid the drift but are only as good as the guess: a camera left on a tungsten setting outside turns everything blue. Fortunately, as long as no channel is clipped, white balance is one of the most forgiving corrections to make afterwards.
Neutralise a cast with Pick white and the parade
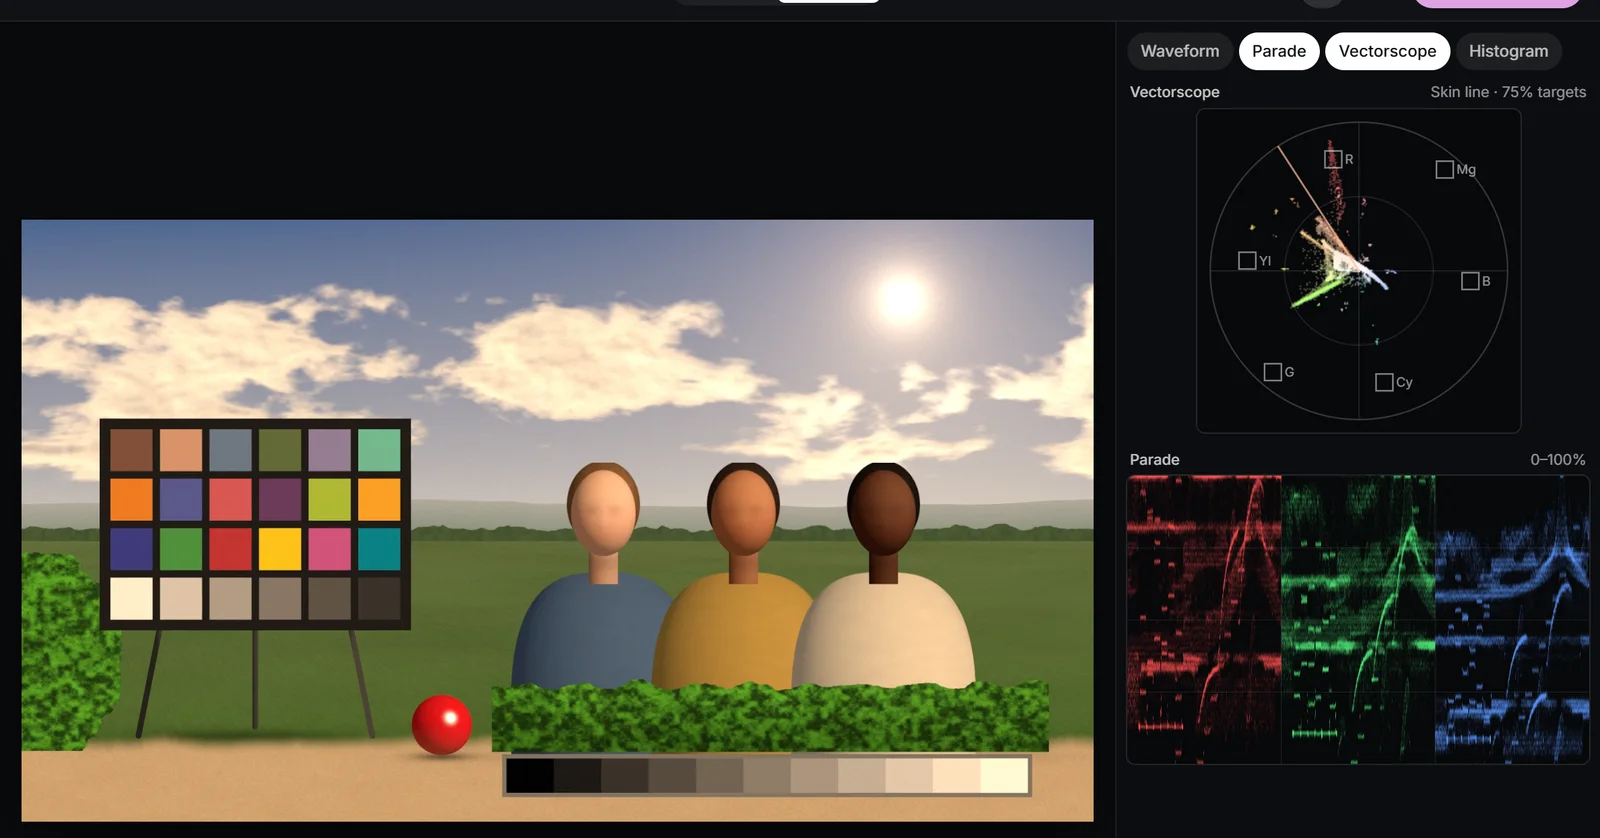
A neutral surface reflects red, green and blue equally. If the camera recorded it with more red than blue, the difference came from the light, and since that light fell on everything, the same correction fixes the whole frame. Pick white (W) automates this: click something that should be neutral and it measures the patch in linear light, then sets Temperature and Tint to the values that neutralise it. The sliders stay editable afterwards.
Temperature works as a camera does, by scaling the channels in linear light (±100 is ±0.75 of a stop of red against blue), and it keeps the luminance of white the same, so a correction changes colour without making the shot lighter or heavier.
 (enlarge image)
A tungsten cast on the Parade: red high, blue low, even on neutral grey.
Choosing a good reference
- A light or mid grey, not the brightest white: a near-white patch may have one channel clipped, which skews the reading. On the chart, the middle steps of the grey wedge are ideal.
- Lit by the same light as the subject. A white wall in the sun says nothing about a face in the shade.
- Truly neutral: cream paint, ivory fabric and “white” objects catching a coloured reflection all mislead.
Confirm on the scopes
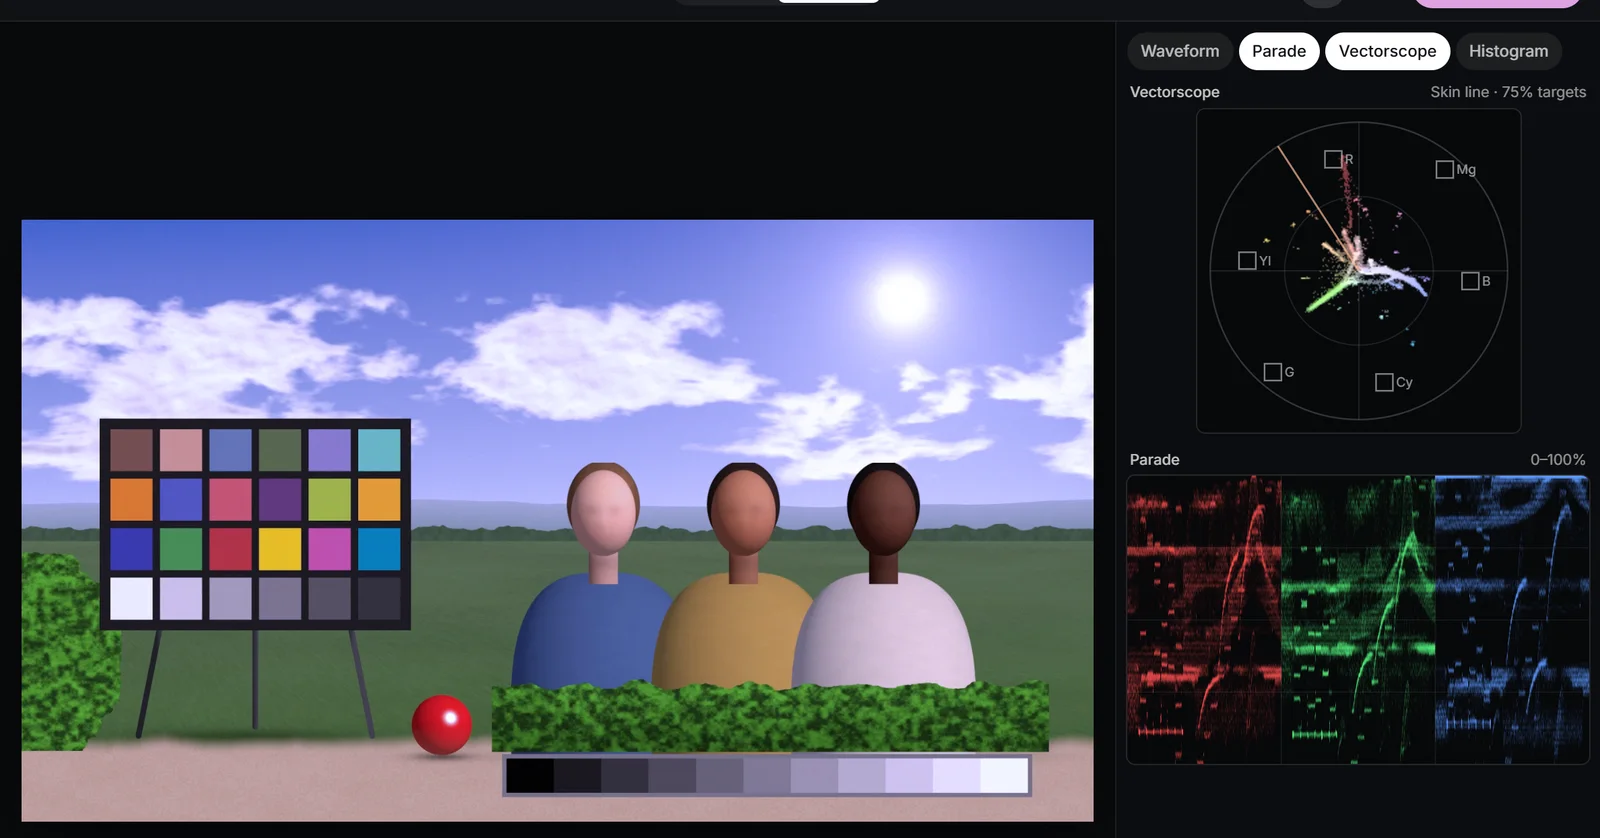
On the Parade, the red, green and blue traces over the neutral area should now be the same height, and on the Vectorscope the neutral patches should sit on the centre dot. Check more than one level: if the mid steps of the grey wedge line up but the top or bottom steps don’t, the cast isn’t a simple white balance error, and the wheels are the better tool. See how to read video scopes for a refresher.
 (enlarge image)
After Pick white on a mid-grey step, the traces line up.
Temperature and Tint versus the Offset and Gain wheels
Temperature and Tint constrain the correction to the axes that real light follows, which makes them fast and hard to misuse. The colour wheels are unconstrained: the puck can push in any direction, so they fix casts that don’t follow the light, and casts that are not proportional to it. The shape of the cast on the parade tells you which to reach for:
| The parade shows | Kind of cast | Best fix |
|---|---|---|
| Gap grows from black to white | Coloured light (proportional) | Pick white, Temperature, Tint, or Gain |
| Same gap at every level | Added colour: flare, haze, a bad conversion | Offset |
| Gap only at the bottom | Tinted blacks | Lift |
| Gap mostly in the middle | Midtone cast, often from a LUT | Gamma |
| Gap changes during the clip | Auto white balance drift | Keyframes |
Gain multiplies, so like a light source its effect is largest in the lightest tones and zero at black; it is the wheel equivalent of a white balance, though it works on the display-encoded signal rather than in linear light. Offset adds the same amount everywhere, which is right for flare, haze or a cast baked in by a poor conversion, where colour has been added on top of the picture. The colour wheels chapter covers the maths and the R, G, B fields that show each wheel’s exact effect.
Mixed lighting
A global white balance can only neutralise one light. With daylight from a window and tungsten from a lamp in the same frame, balancing for one leaves the other warm or cool. Decide which light matters, almost always the one on the faces, and balance for that. A little warmth from a practical lamp or a little blue from a window usually reads as natural, even pleasant.
When the other light is genuinely distracting, correct it separately. In Secondary, choose Add a secondary layer, isolate the problem area with a Gradient or Circle window, or a qualifier on its colour, and use the layer’s own Temperature and Tint. Because the change lives on its own layer, it doesn’t disturb the main balance. The secondary colour correction chapter shows the technique step by step.
Correction first, warmth on purpose
Neutral is a starting point, not a goal. Warm light reads as comfort, nostalgia or late afternoon; cool light as calm, clinical or cold. The craft is to make those choices deliberately rather than inherit them from the camera.
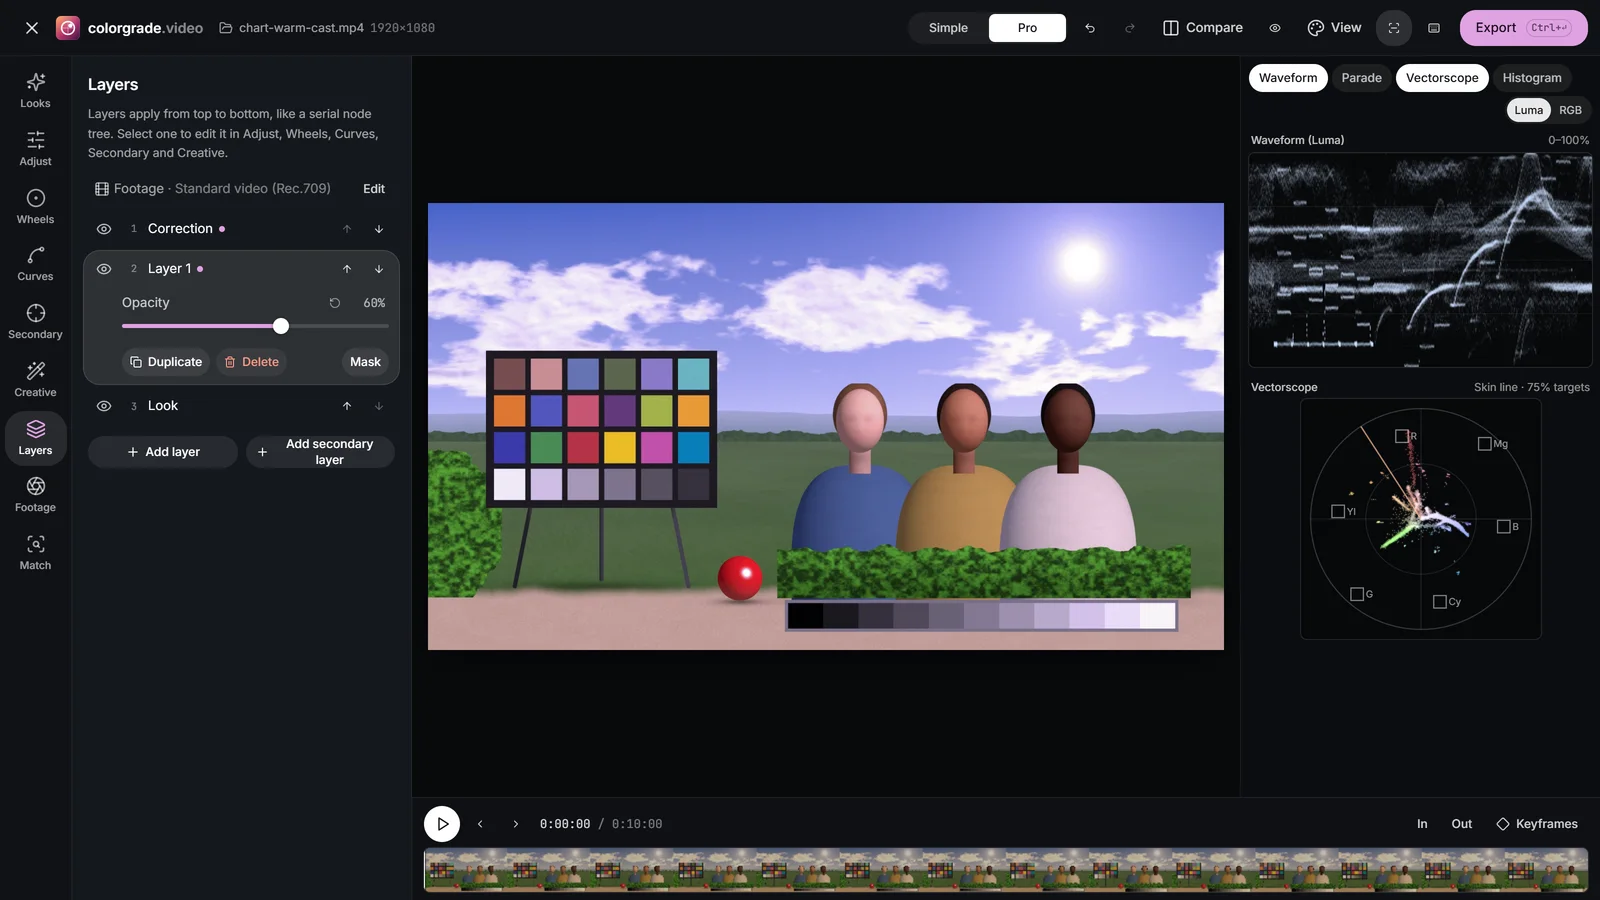
Keep correction and style apart. Neutralise on the Correction layer, then in Layers choose Add layer and warm or cool that layer with Temperature. Its Opacity becomes a dial for how much warmth you want, and you can switch it off to check the neutral version at any time. For a split between warm and cool tones, use Split toning in Creative, or start from a look: teal and orange and cinematic grades both build on a neutral base. The creative looks chapter explains how.
 (enlarge image)
Warmth on its own layer, dialled in with Opacity.
White balance a shot on the parade
Remove a colour cast with Pick white, confirm it on the RGB parade, then add warmth back on a separate layer.
- 1
Open the clip with the parade
Choose Open video or photo, switch to Pro, and show Parade and Vectorscope in the Scopes column.
- 2
Pick a neutral reference
In Adjust, press Pick white (W) and click a light-to-mid grey surface lit by the same light as your subject.
- 3
Check the traces
On the Parade, the red, green and blue traces over the neutral area should line up; on the Vectorscope, neutrals should sit at the centre.
- 4
Fix what is left with the wheels
If only the shadows still lean one way, open Wheels and nudge the Lift puck the opposite way; if the whole trace is shifted, use Offset.
- 5
Add warmth on purpose
In Layers, choose Add layer, raise Temperature on that layer in Adjust, and set its Opacity to taste.
Drop a video or photo to colour gradeChoose a video or photo to grade
Opens in the studio: looks and Auto colour for a quick result, wheels, curves, masks and scopes when you want more.It opens in the studio on your phone. Nothing is uploaded.
MP4, MOV, WebM, MKV, JPG, PNG, WebP
Free · no watermark · graded on your device, never uploaded