
Free · runs in your browser

Match Colors Between Clips

Give one clip the colour and contrast of another clip, a photo or a film still you admire. Choose a reference, decide how far to go, then finish by hand.

Drop a video to colour gradeChoose a video to grade

Or choose one from your computer. Try looks on your own footage before you save anything.Pick a clip from your photos or files. It stays on your phone.

Works with MP4MOVWebMMKVand more

Graded on your device. Your video is never uploaded.

  1. 1Choose
  2. 2Grade
  3. 3Download

To color match video, open the clip you want to change; on this page the Match colours panel is already open. Select Choose a reference, pick a still image (JPG, PNG or WebP) or a frame from another video, and the clip’s colour balance and contrast are pulled towards the reference. Match amount sets how far it goes, and Remove match undoes it.

Matching is the fastest way to make a phone clip sit beside a camera clip, or to borrow the mood of a still you like. It compares overall statistics rather than objects, though, so treat it as a strong first draft: the finishing touches usually come from Temperature, Tint or the Wheels in Pro tools. If both clips share the same cast, sort that out first with white balance, and see the last section below for copying a grade you have already made.
How to match the colours of two clips

  1. Open the clip that should change

    Choose Select video for the clip you want to bring into line. On this page the Match colours panel (M) is open from the start.

  2. Choose a reference

    Select Choose a reference and pick a JPG, PNG or WebP image, or a frame from another video. A reference showing a similar scene works best: faces for faces, daylight for daylight.

  3. Set Match amount

    Drag Match amount until the two clips look like neighbours. Full strength copies the reference as closely as the method allows; a setting between half and three-quarters often looks more natural.

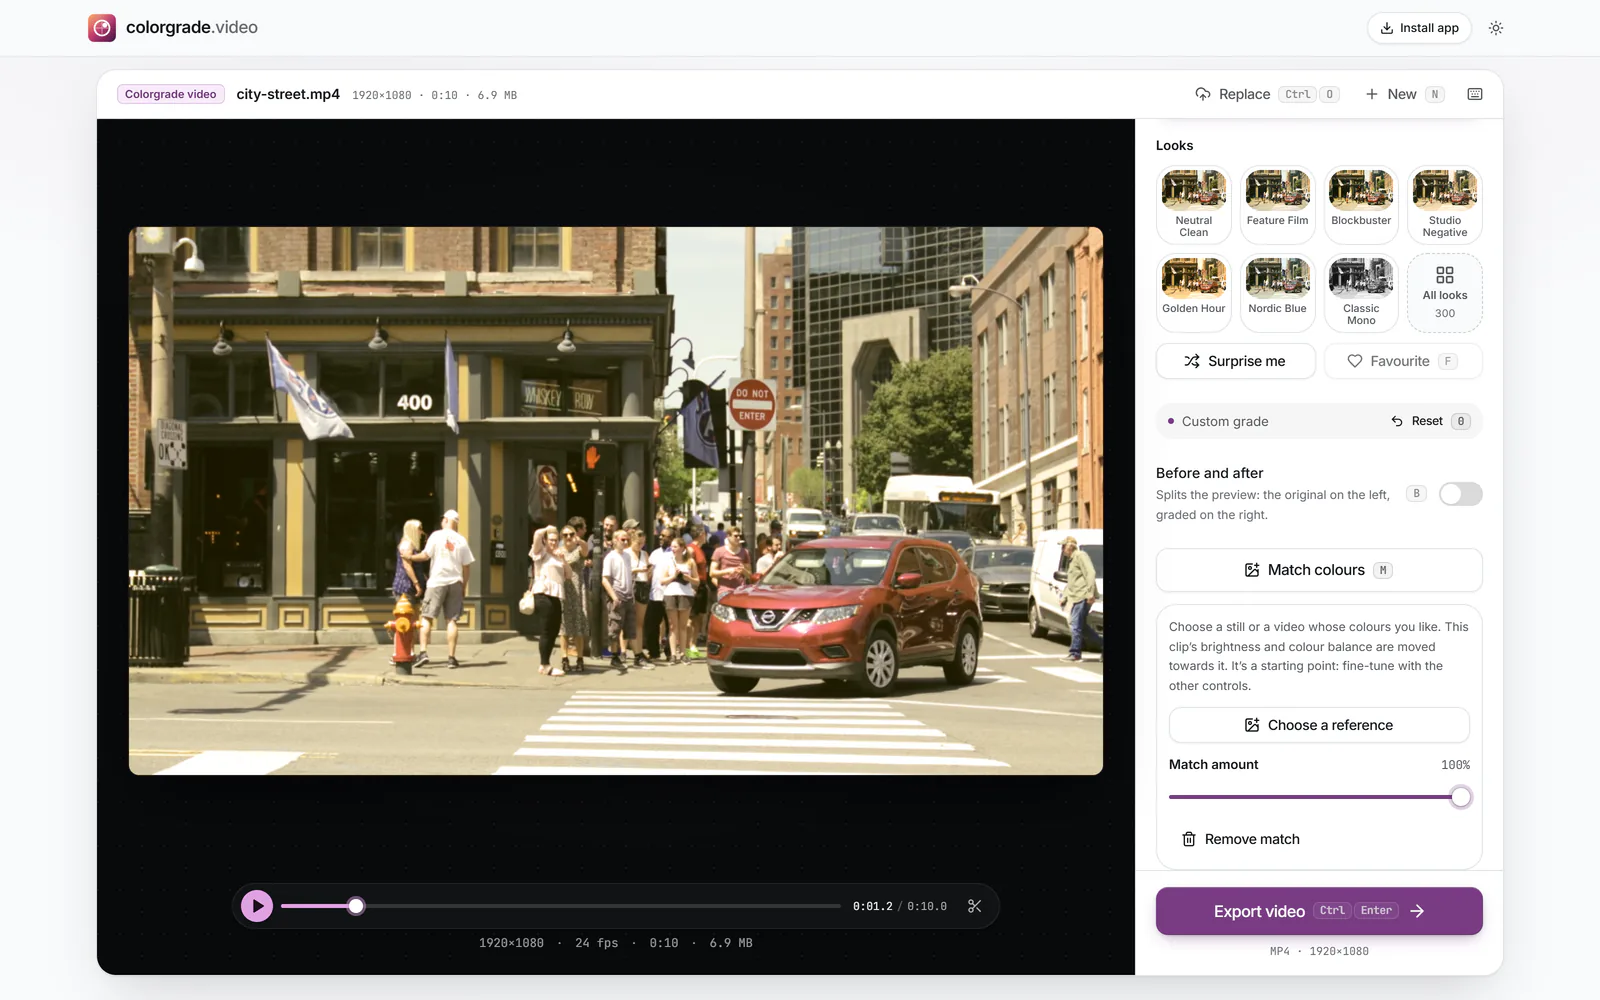
    The Match colours panel after choosing a warm reference still: the street clip in the preview has taken on warmer tones, and the panel shows Choose a reference, a Match amount slider at 100% and Remove match (enlarge image)

    After Choose a reference, the clip takes on the reference’s colour balance; Match amount sets how far.

    1. Choose a reference
    2. Match amount
  4. Refine and compare

    Open Pro tools (P) to finish with Temperature, Tint or the Wheels, and switch Before and after (B) on and off to see exactly what moved.

  5. Export

    Select Export video, then Download video. Repeat with the next clip and the same reference to bring a whole sequence together.

How the match is calculated

Both pictures are converted into CIELAB, a colour space designed around human vision. It has three channels: L for lightness, a for the green-to-magenta axis and b for the blue-to-yellow axis. For each channel the tool measures the average and the spread (how far values stray from that average) in your clip and in the reference, then shifts and stretches your clip’s values so its averages and spreads line up with the reference’s.

Each part of that does a recognisable job. Moving the a and b averages removes or adds a colour cast. Matching the spread of L brings the contrast into line, and matching the spread of a and b makes the clip as colourful, or as restrained, as the reference. Working in CIELAB rather than plain RGB keeps those jobs separate, so fixing the cast doesn’t also change the contrast.

Why the result is never exact

  • Content counts as colour. A reference full of blue sky and a clip full of green lawn have different averages because of what is in them, not because of the light. The maths can’t tell the difference, so it may tint the lawn bluish.
  • One correction for the whole frame. There are no regions: a reference with warm faces and a cold background produces a single compromise, not warm faces and a cold background.
  • Borders and captions count too. Black letterbox bars, logos and subtitles in a reference all join the statistics and drag the match towards them.
  • Extreme references overshoot. At full Match amount, a neon-lit or heavily stylised still can push ordinary footage too far. Lower the amount instead of fighting it with other sliders.

Picking a reference that works

  • Use a frame from the other clip itself when you are matching two cameras at the same event. It shares the scene, so the statistics compare like with like.
  • Choose a moment with a similar mix of subject and background to the clip you are changing: a close-up for a close-up, a wide shot for a wide shot.
  • Crop away black bars and burnt-in text before saving a still as a reference.
  • Prefer a clean, well-exposed frame. Clipped skies and blocky compression in the reference become part of the target.
  • Use the scopes to judge rather than your eyes alone: the Parade shows whether the red, green and blue levels of the two clips line up, and the Vectorscope shows whether skin falls on its line.

Each clip is measured on its own, so matching three clips to one reference gives each one the correction it needs. That is different from copying a grade, which applies identical settings whatever the clip looks like.

Copying a grade instead of matching

If you have already graded one clip and want the next to look the same, you may not need matching at all. Copy grade (Shift+C) stores the settings and Paste grade (Shift+V) applies them; the copied grade survives opening another video in this browser, so you can work through a folder of clips from one shoot. Save as my look (Shift+S) keeps a grade under My looks for later, and Export .cube (Shift+L) writes it as a LUT for other editors.

Matching in other editors

Desktop editors have their own match tools. In Premiere 26.x, the Lumetri Color panel’s Color Wheels & Match section uses Comparison View, Face Detection and Apply Match; Adobe has removed that Clip Match feature from the new Color mode beta. DaVinci Resolve’s Color page offers Shot Match to This Clip by right-clicking the reference thumbnail, and it is in the free version. iMovie on a Mac has Match Color under Color Balance. Our guides to Premiere Pro and DaVinci Resolve cover them step by step.

Colour matching questions

How do I match colour between two clips?

Open the clip that should change, select Choose a reference and pick a frame from the other clip. Set Match amount, compare with Before and after, tidy up with Temperature and Tint if needed, then select Export video.

Can I match my video to a photo or film still?

Yes. Any JPG, PNG or WebP image can be the reference, so a holiday photo, a screenshot of a film or a frame grab from a music video all work. Choose a still whose content resembles your clip for the most faithful result.

How do I copy a colour grade from another video?

Save a representative frame of that video as an image and use it as the reference. You get its overall balance, contrast and colourfulness, though not the exact grade its colourist built. To reuse a grade you made here, use Copy grade and Paste grade instead.

Why doesn’t the match look exact?

The method matches the average and spread of lightness and colour across the whole frame. Different subjects, black bars in the reference, or a reference with very mixed lighting all pull the result away from what your eye expects. Lower Match amount and finish with Temperature, Tint and the Wheels.

Does matching keep skin tones right?

It doesn’t detect faces, so check them. Open the Vectorscope in Pro tools: skin of every complexion should sit close to the skin tone line. If it has drifted, reduce Match amount or correct with Tint.

Can I match several clips to the same reference?

Yes. Open each clip in turn and choose the same reference. Because every clip is measured separately, each receives its own correction towards the shared target.

Is my reference image uploaded?

No. The reference, like the video, is read and measured inside your browser and never leaves your device.