
Free · runs in your browser

Apply a LUT to Video Online

Load a camera conversion LUT or a creative look, preview it on your own footage with tetrahedral interpolation, and save the result as a new video. The LUT and the video both stay on your device.

Drop a video to colour gradeChoose a video to grade

Or choose one from your computer. Try looks on your own footage before you save anything.Pick a clip from your photos or files. It stays on your phone.

Works with MP4MOVWebMMKVand more

Graded on your device. Your video is never uploaded.

  1. 1Choose
  2. 2Grade
  3. 3Download

To apply a LUT to a video online, open the clip above, choose Import LUT on the LUT tab and pick your .cube or .3dl file. The preview changes straight away, LUT intensity controls how much of it you see, and Export video writes the result to a new file. Neither the LUT nor the footage is uploaded: your browser reads both from your device.

A LUT is only a table of colour conversions, so the same feature serves two different jobs. A technical LUT turns a camera’s log recording into normal video (the log to Rec.709 page explains when you need one), while a creative LUT adds a look. Apply LUT lets you put the file Before the grade for the first job or After the grade for the second. No LUT to hand? Any look on this site can be saved as one of our free .cube LUTs.

How to apply a LUT to a video

  1. Open your video

    Drop it on the tool or choose Select video. Pro tools opens on the LUT tab, ready for a file.

  2. Import the LUT

    Choose Import LUT and pick a .cube (3D from 2 to 65 points, or 1D) or a .3dl file. Its name and grid size appear underneath, so you can confirm you loaded the right one.

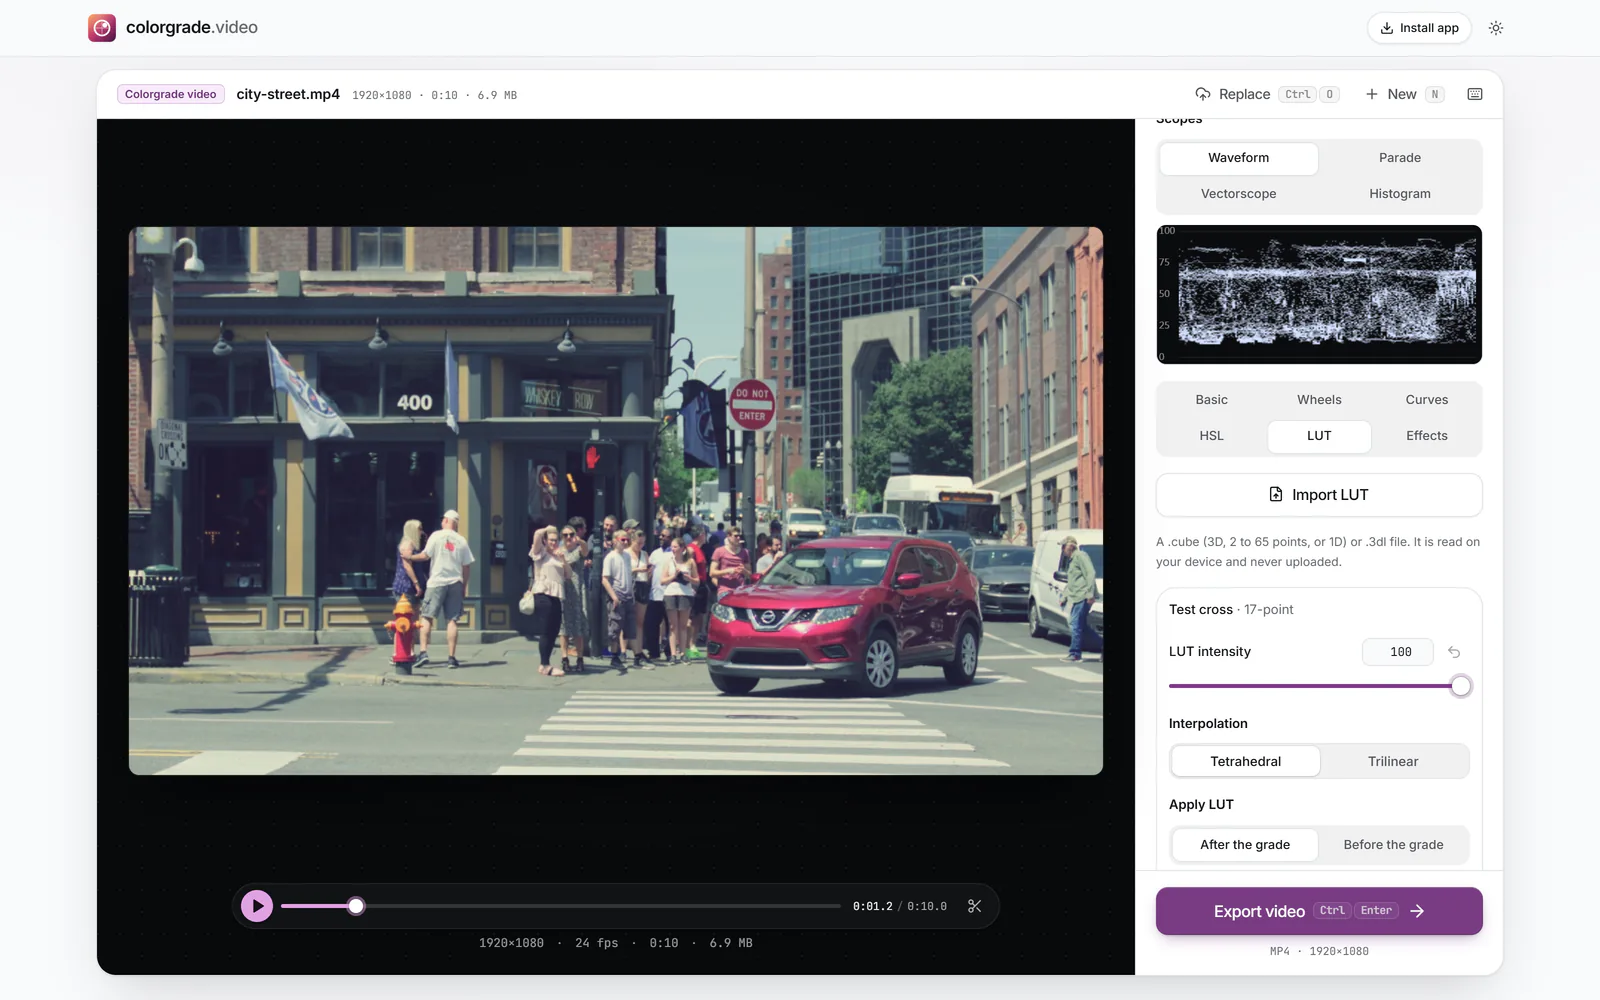
    Pro tools open on the LUT tab after importing a 17-point .cube file named Test cross: LUT intensity at 100, Interpolation set to Tetrahedral and Apply LUT set to After the grade, with the waveform scope above and the graded street scene in the preview (enlarge image)

    Import LUT reads the .cube on your device; LUT intensity, Interpolation and Apply LUT appear underneath.

    1. Import LUT
    2. Apply LUT
  3. Decide where it sits

    Under Apply LUT, choose Before the grade for a camera conversion LUT, so the sliders and wheels work on normal-looking video. Choose After the grade for a creative look that should sit on top of your corrections.

  4. Set strength and interpolation

    Lower LUT intensity if the look is heavy-handed. Leave Interpolation on Tetrahedral for the most accurate result; Trilinear is there for comparison with apps that use it.

  5. Export

    Choose Export video, then Download video when Your video is ready appears. Remove LUT clears the file if you want to try another.

What a LUT really is

LUT stands for lookup table. A 3D LUT is a cube-shaped grid laid over every possible colour: red along one edge, green along another, blue along the third. At each point of the grid, the file stores the colour that input should become. A 33-point LUT has 33 × 33 × 33 = 35,937 entries; a 65-point LUT has 274,625. That sounds like a lot, but a 10-bit video can contain over a billion colours, so nearly every pixel falls between grid points and its new colour has to be worked out from the neighbours.

Tetrahedral versus trilinear

Trilinear interpolation blends the eight corners of the little cube a colour falls in. Tetrahedral interpolation first splits that cube into six tetrahedra, finds the one containing the colour and blends just its four corners. The tetrahedral split keeps the diagonal from black to white exact, so greys stay grey, and it avoids the slight hue shifts trilinear blending can add around strong colours. It costs almost nothing extra on a graphics chip, which is why it is the better default.

1D LUTs and .3dl files

A 1D LUT is three separate curves, one per channel. It can change contrast, gamma or overall tint but cannot move one hue without moving others, which is why looks are almost always 3D. The .cube format is plain text with a size header and rows of decimal numbers between 0 and 1. The .3dl format stores whole numbers instead and lists its grid positions on the first line. Both open here, so use whichever your source provides.
Technical LUTs, creative LUTs and the order of operations

Every LUT is built for a particular kind of input. A conversion LUT for Sony S-Log3 expects S-Log3 pixels; feed it ordinary phone footage and the result is harsh and over-saturated. A creative LUT is usually designed for standard Rec.709 video; feed it log footage and the look sits on a flat, grey base and never comes alive. Placement follows from that.

  • Before the grade suits camera LUTs and anything else that changes the colour space. Basic, Wheels, Curves and HSL then work on the converted picture, just as they would on normal footage.
  • After the grade suits looks. Correct the clip first with Auto colour or the Basic sliders so the LUT receives the neutral input it was designed for.
  • If your log profile is in the Footage menu on Basic, you can use that conversion instead of a LUT and keep the LUT tab free for a creative file.

When a LUT looks wrong

  • Wrong input: the commonest cause by far. Check which camera profile the LUT was made for, and whether your footage was shot in it.
  • Too strong: many sold looks are built to impress in a thumbnail. Bring LUT intensity down to 50 to 70% and they often look far better.
  • Banding in skies and walls: small grids (17 points or fewer) can turn smooth gradients into steps. Ask for a 33 or 65-point version if one exists.
  • Different from another app: editors differ in interpolation and colour management. Switch Interpolation to Trilinear to see whether that explains it.
  • Missing grain or vignette: a LUT can only change one colour into another, pixel by pixel. Anything that depends on position or neighbouring pixels, such as grain, vignette or glow, is never stored in it.

The Vectorscope and Parade above the tabs are the quickest way to see what a LUT has done: a good conversion LUT on correctly exposed footage leaves neutral objects with level channels and faces near the skin tone line.

LUT questions

What is a LUT in video editing?

A lookup table: a file that maps each input colour to an output colour. Editors use them to convert log footage to normal video, to share a look between apps and to keep several clips consistent. Grading tools then interpolate between the stored points for every pixel.

How do I apply a LUT to a video on iPhone or Android?

Open this page in Safari or Chrome on the phone, choose Select video, then Import LUT and pick the .cube or .3dl from Files or your downloads folder. Everything runs on the phone, so long 4K clips take longer than on a computer.

.cube vs .3dl: which works?

Both. The tool reads 3D .cube files from 2 to 65 points, 1D .cube files and .3dl files. .cube is the more common format today, and it is what Export .cube saves when you turn your own grade into a LUT.

LUT vs filter: what is the difference?

A filter in a phone app is often a LUT underneath, sometimes with grain or a vignette added. The difference is portability: a LUT is a standard file that DaVinci Resolve, Premiere, CapCut desktop and many other apps can read, whereas a filter usually only exists inside its own app.

Can I change the LUT strength?

Yes. LUT intensity blends from the original picture at 0% to the full LUT at 100%. It is the quickest fix for a look that is close but too heavy.

Is my LUT file uploaded or stored anywhere?

It is never uploaded. To let a page reload restore your work, the imported LUT is kept in this browser’s own storage for the editor, alongside the open video. Clearing the site’s data removes it.

Why does the LUT look different here than in my editor?

Usually because the editor converts colour before the LUT runs, for example through Premiere’s colour management or a Resolve node earlier in the chain, or because it uses trilinear interpolation. Make sure both apps feed the LUT the same kind of input.