Chapter 8 of 13 · Advanced · 9 min read
Log Footage, Color Spaces and LUTs Explained
Log footage confuses people because it looks wrong on purpose. It is flat, grey and pale straight out of the camera, and it only looks right after a conversion that most phone apps and editors hide from you. Once you understand what that conversion does, a lot of grading problems disappear: looks that turn muddy, LUTs that clip, skin that goes strange on one camera but not another.
This chapter explains the ideas underneath: what a log curve and a wide gamut are, how colour management moves footage from the camera’s colour space into a working space and out again, how Rec.709 and Rec.2020 differ, and what a 3D LUT really contains. If you just want to convert a clip, the log to Rec.709 converter and the Apple Log to Rec.709 page do that in a few clicks. Here we go into why.
Video guide
Log Footage Color Management: Convert First, Then Add a Look
Chapters
Why log footage looks flat
A camera sensor responds to light linearly: twice the light gives twice the signal. Each stop of exposure is a doubling, so in a linear file the brightest stop takes half of all the code values and the darkest stops share a handful. That wastes precision on highlights, where the eye can’t see small differences, and starves the shadows, where it can.
A log curve fixes this by recording the logarithm of the light, which gives each stop roughly the same number of code values. Twelve or more stops fit into a 10-bit file with room to grade. The price is that nothing is encoded for a screen. In Sony’s S-Log3, for example, 18% grey lands at about 41% on a waveform, a white card at only about 61%, and the darkest shadows never reach the bottom. The curve keeps climbing above white to hold several more stops of highlight. Shown as is, the picture has no real black and no real white: it looks flat.
Gamut: why log also looks pale
Most log profiles also record in a wide gamut such as S-Gamut3.Cine, V-Gamut or Cinema Gamut. A gamut is defined by three primaries, the purest red, green and blue the format can describe, plus a white point. Wide-gamut primaries lie well outside the ones a normal screen uses. Show that file without converting it and the screen reads the numbers as if they used its own primaries, so every colour appears less saturated than it was. Log is two problems at once, tone and gamut, which is why a proper conversion has to handle both.
Shoot log in 10-bit wherever the camera offers it. With only 256 levels per channel, 8-bit log spreads too few values across each stop, and smooth gradients like skies band once the contrast is put back.
Colour management in plain words
Colour management means always knowing what the numbers in a file mean and converting them deliberately. Every managed pipeline has the same three stages:
- Input transform. Undo the camera’s log curve to recover scene light, then convert its gamut into the working space with a 3×3 matrix.
- Working space. Where you grade. Because every camera now speaks the same language, a grade behaves the same on a Sony clip and a Panasonic clip.
- Output transform. Render the scene for a display, rolling off the highlights, and encode it for the delivery standard, usually Rec.709 for SDR video.
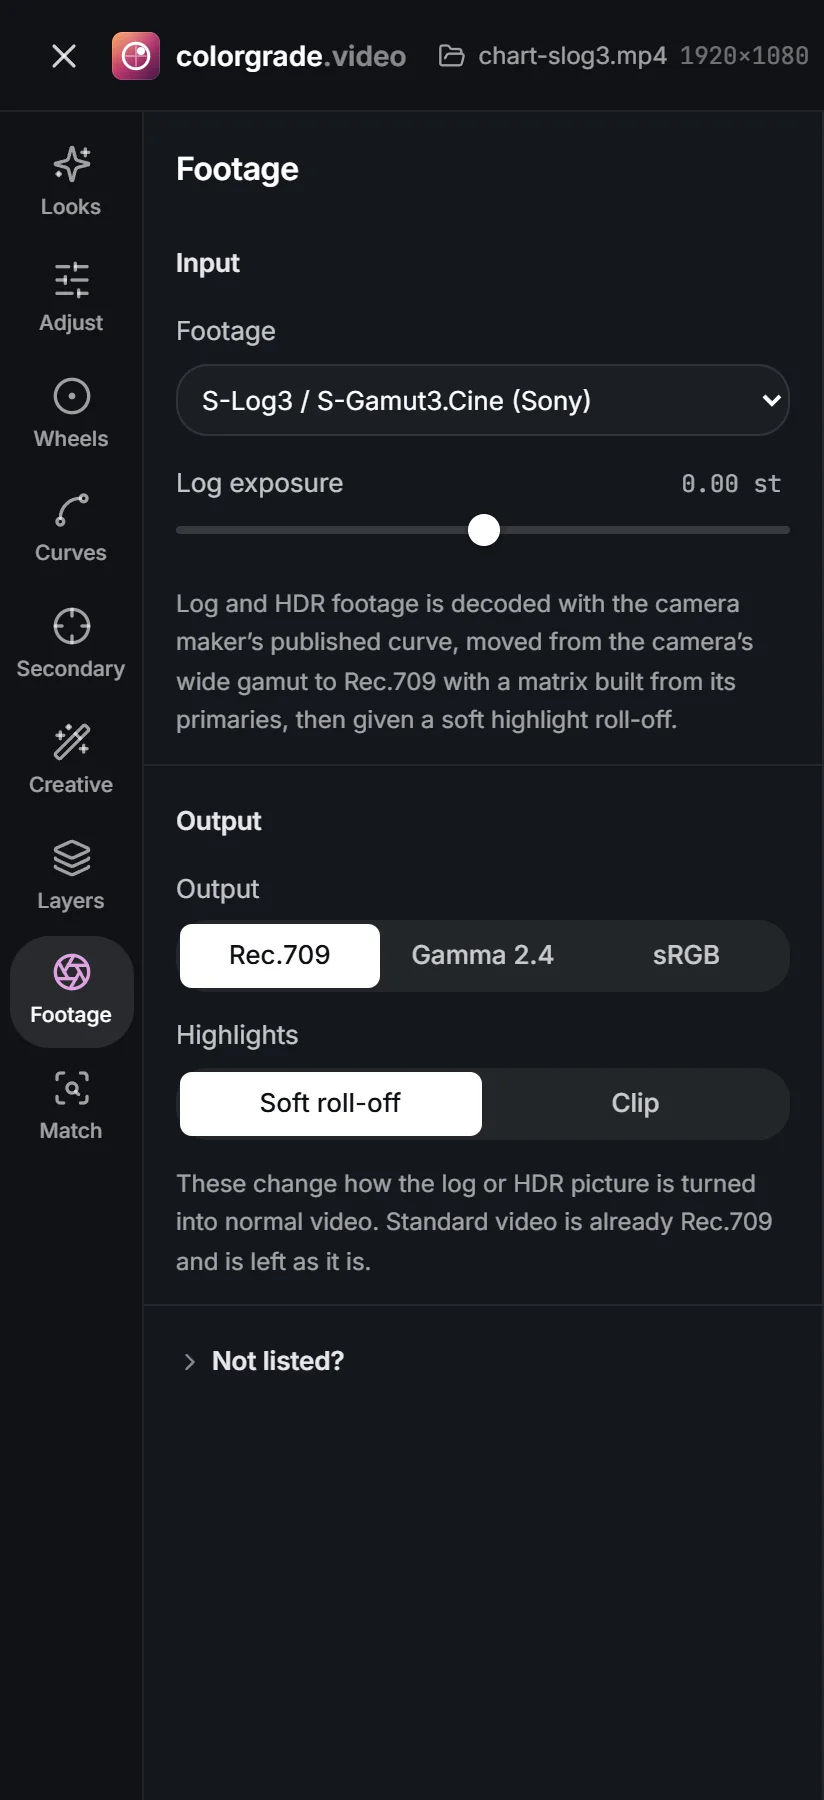
DaVinci Resolve does this with a Color Space Transform effect or a colour-managed project; ACES is the same idea with an industry-standard working space. In the studio, the Footage panel is the input transform, your layers are the work in the working space, and the Output setting plus the highlight roll-off form the output transform. Footage that was never log, an ordinary phone clip for example, stays on Standard video (Rec.709) and passes through untouched.
Rec.709 versus Rec.2020
Rec.709 is the standard for HD video: its primaries, white point and transfer curve are what ordinary screens, players and platforms expect. Rec.2020 is the standard for UHD and HDR, with primaries so pure that it covers roughly three quarters of the colours humans can see, against about a third for Rec.709. Some log formats, such as Apple Log / Rec.2020 and N-Log / Rec.2020, record in Rec.2020 primaries. Converting to Rec.709 has to squeeze those extra colours into the smaller gamut, so watch very saturated light sources, such as neon and LED signs, on the Vectorscope after converting.
Choosing an output curve
| Output | What it is | Use it when |
|---|---|---|
| Rec.709 | BT.709 camera curve (default) | Almost always: matches camera LUTs and what editors expect |
| Gamma 2.4 | Pure 2.4 display encoding | The next step expects display-referred 2.4 |
| sRGB | The computer and web curve | Stills or graphics work in sRGB |
The difference is visible: with Gamma 2.4 or sRGB, mid-grey is encoded higher than with Rec.709, so the same grade looks lighter and softer in the shadows. Pick what the next step expects and grade with that choice made. Highlights offers Soft roll-off, which bends the top of the range smoothly as film does, or Clip, which keeps everything linear until it hits white.
Setting up the Footage panel
- In Pro, open Footage and choose the entry that matches both halves of the camera setting, curve and gamut. S-Log3 / S-Gamut3.Cine and S-Log3 / S-Gamut3 are different conversions; picking the wrong half gives believable but wrong colour.
- Trim Log exposure if you exposed away from the maker’s reference, as many people do with log. It works in stops before the conversion, so the curve stays correct.
- Leave Output on Rec.709 unless you know you need another.
- Now grade. Auto colour, white balance and looks all act on the converted picture.
 (enlarge image)
The Footage panel: input transform, Log exposure, Output and the highlight roll-off.
 (enlarge image)
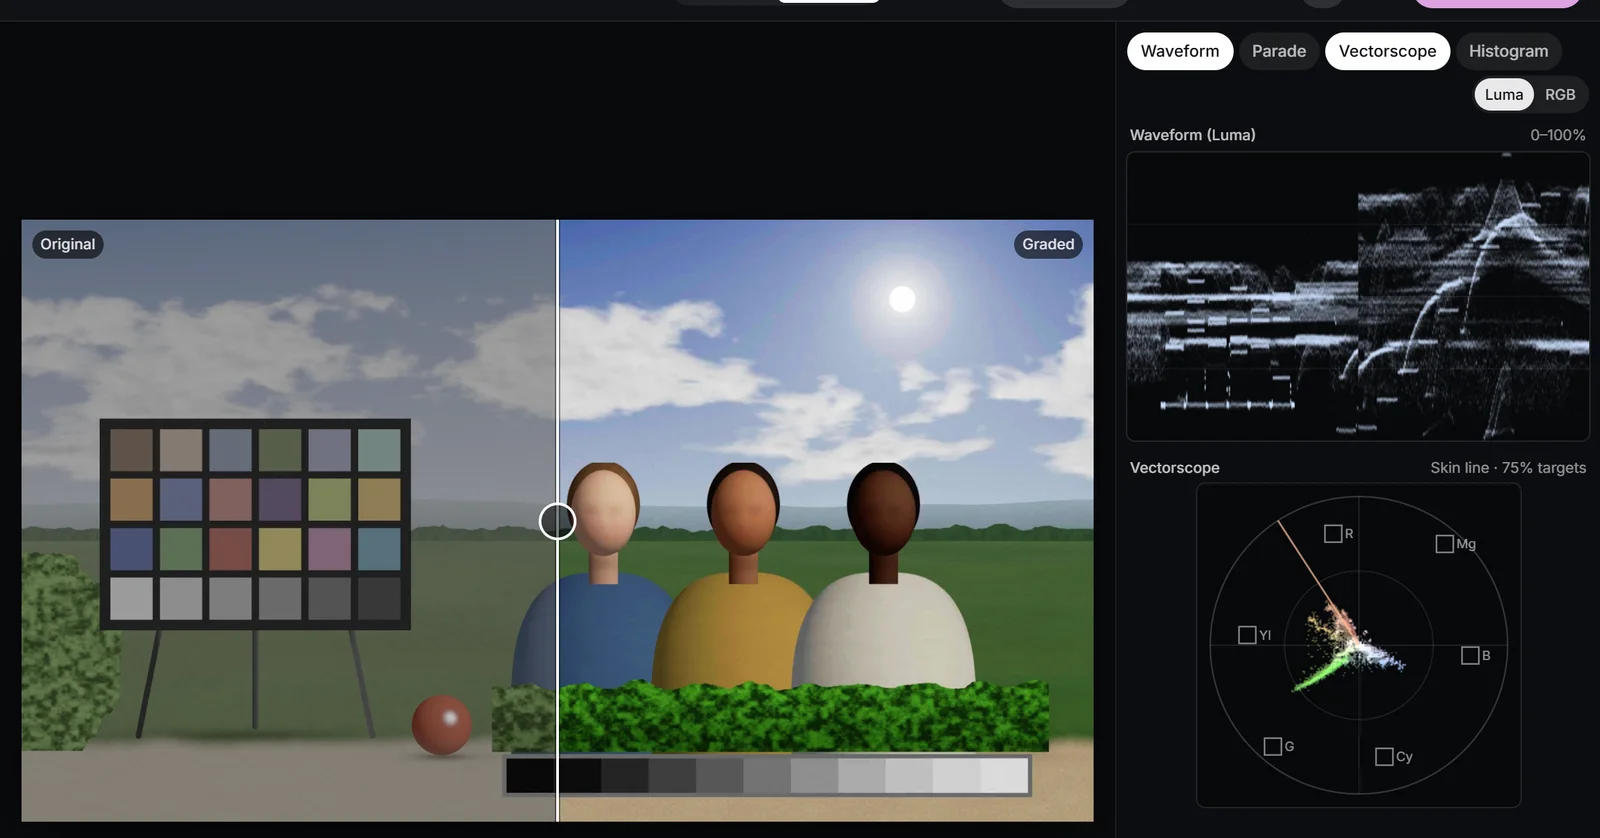
S-Log3 before and after S-Log3 / S-Gamut3.Cine: the waveform spreads to a full range.
The conversions use the transfer functions and gamut matrices the camera makers publish. Where makers haven’t published them, the studio says so: D-Log M (approximate) is an approximation, and Apple Log 2, GoPro Log and Samsung Log are not built in. For those, import the maker’s own LUT with Apply LUT set to Before the grade and leave Footage on Standard video (Rec.709). Never convert twice: a clip a phone app has already turned into Rec.709 is not log any more.
What a 3D LUT really is
A look-up table is a list of answers worked out in advance. A 1D LUT has a curve for each channel separately, so it can change contrast and per-channel balance but nothing that depends on the mix of channels. A 3D LUT samples the whole colour cube: for a grid of input colours it stores the output colour, and anything between grid points is interpolated. Because it maps each colour to any other colour, a 3D LUT can hold saturation changes, hue shifts, a log conversion or a complete look.
| Size | Grid points | Typical use |
|---|---|---|
| 17 | 4,913 | Gentle looks, small files |
| 33 | 35,937 | The usual default for looks and conversions |
| 65 | 274,625 | Steep conversions and fine detail |
Tetrahedral versus trilinear
Each colour falls inside a small cube of eight grid points. Trilinear blends all eight. Tetrahedral splits the cube into six tetrahedra and blends the four corners of the one the colour lies in. Tetrahedral is more accurate for the same grid, keeps neutral greys on the grey axis, and handles sharp hue changes more smoothly, so it is the default here; DaVinci Resolve and other applications offer both. Switch Interpolation to Trilinear only to match an application that uses it.
What a LUT cannot hold
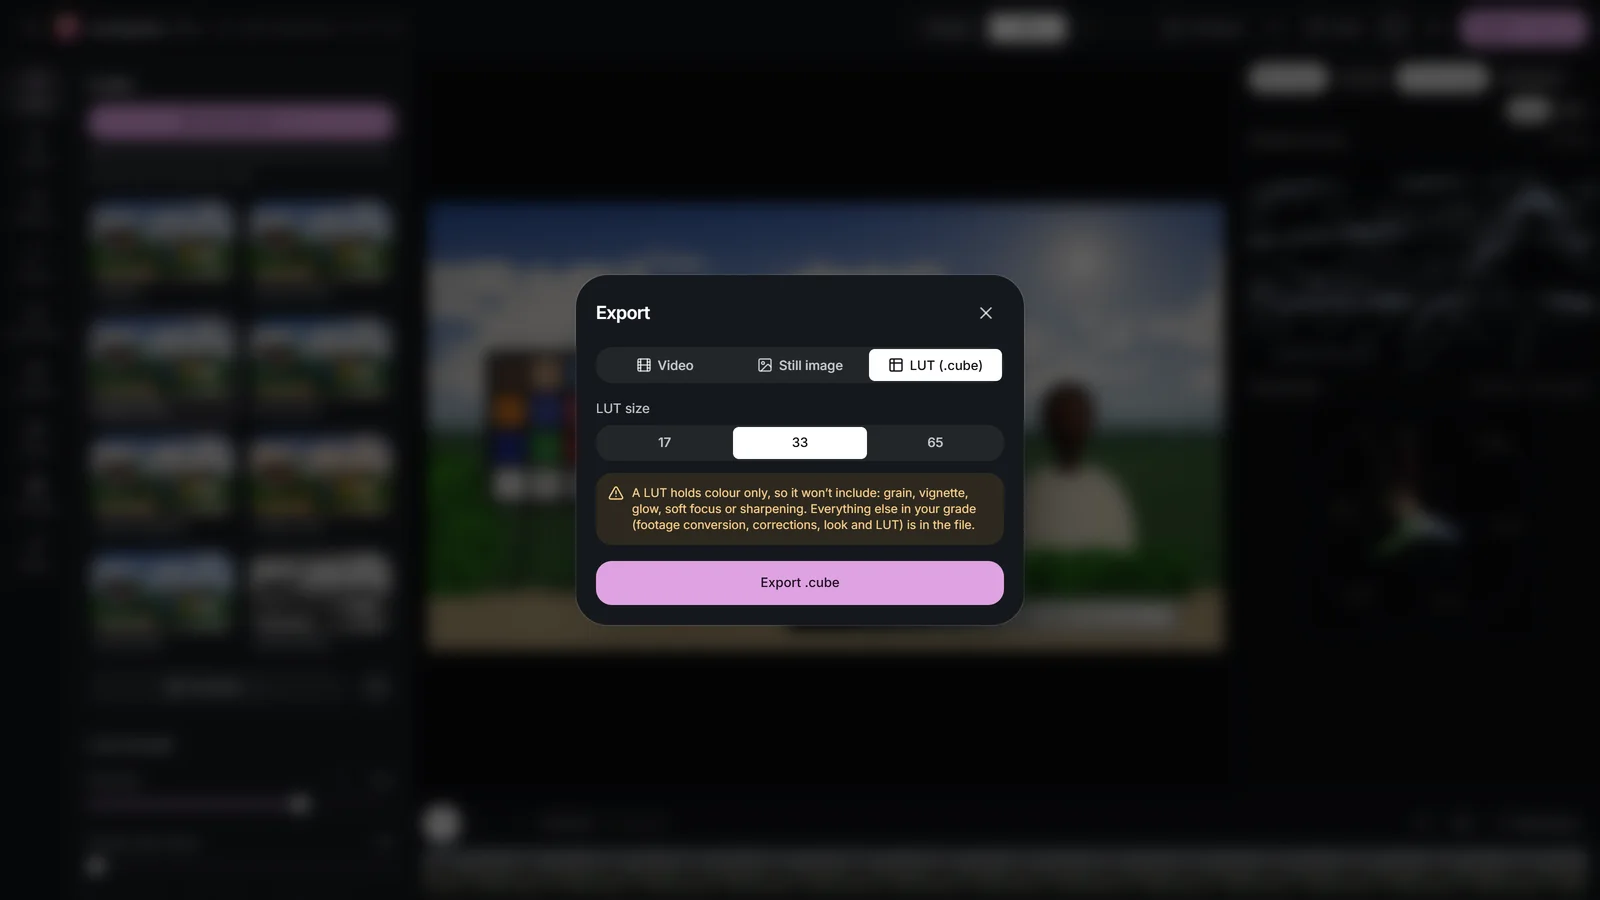
A LUT sees one pixel at a time and knows nothing about its neighbours, its position or the time. So it cannot hold grain, sharpening, halation, bloom, a vignette, a window or qualifier that depends on position, or keyframes. It also only covers the input range it was built for: values above its top, such as log highlights fed into a LUT built for Rec.709, are clipped. That is why the studio’s Export .cube warns when the grade contains anything a LUT can’t carry.
 (enlarge image)
Exporting a grade as a .cube: LUT size sets the grid; 33 suits most looks.
Technical LUTs and creative LUTs
Both are .cube files, and that causes most LUT mistakes. They do different jobs at different points in the chain:
| Technical (conversion) LUT | Creative (look) LUT | |
|---|---|---|
| Job | Convert log to Rec.709 | Add a style |
| Expects | One specific camera profile | Corrected Rec.709 footage |
| Apply LUT | Before the grade | After the grade |
| LUT intensity | Always 100% | To taste, often 40-80% |
| Examples | Maker’s log-to-709 LUT | Film, teal and orange, moody |
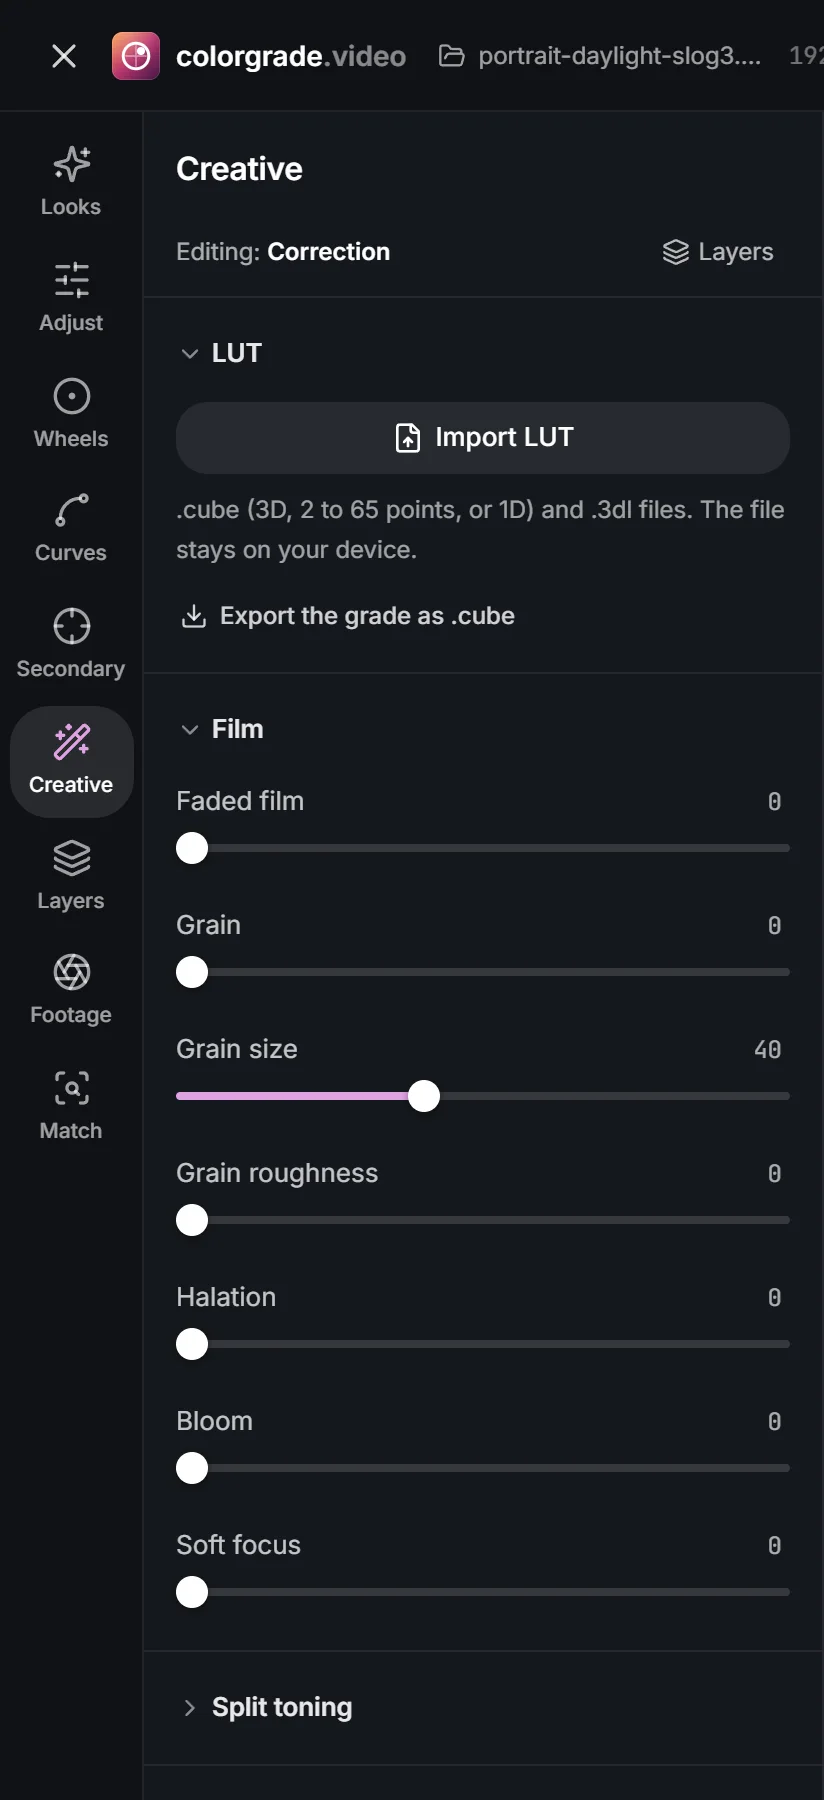
The order is conversion, then correction, then look. A creative LUT applied to raw log gets the wrong input and looks muddy; a conversion LUT applied after you have already balanced the footage converts something that is no longer log. LUT intensity below 100% on a conversion LUT doesn’t give a softer conversion; it gives a mixture of right and wrong colours. On a creative LUT it is the most useful control there is, and the next chapter, building a creative look, shows what to put in one.
 (enlarge image)
LUT controls in Creative: Apply LUT decides whether the LUT converts or styles.
HDR footage: HLG and PQ, honestly
HDR video is not log, but it raises similar questions. HLG (hybrid log-gamma) uses a curve that looks roughly normal on an SDR screen in its lower part and log-like above it; many phones record it by default. PQ, used by HDR10, describes absolute light levels up to 10,000 nits. Both use Rec.2020 primaries, together defined as Rec.2100.
The studio grades and exports SDR. HLG (Rec.2100) and PQ / HDR10 (Rec.2100) in Footage tone-map HDR down to SDR with a simple curve, and the panel labels them as approximations. There is a further catch: browsers often convert tagged HDR video to SDR before the studio ever sees it. If you choose HLG (Rec.2100) for a phone clip and the picture looks wrong, usually too contrasty, the browser had probably converted it already; set Footage back to Standard video (Rec.709). For an HDR master, use an application built for HDR delivery.
Try it: convert log, then add a look
Convert a log clip with the Footage panel, trim it in stops, then add a creative look after the conversion and check both on the scopes.
- 1
Open the log clip in Pro
Open the clip, switch to Pro and show the Waveform and Vectorscope. The waveform sits in a narrow band and the vectorscope trace is small.
- 2
Set the input transform
Open Footage and choose the profile you shot in, for example S-Log3 / S-Gamut3.Cine. The waveform spreads out and the colours fill out.
- 3
Trim in stops
Adjust Log exposure until mid-tones land where you want them. Leave Output on Rec.709.
- 4
Add the look after the conversion
Pick a look in Looks, or import a creative LUT in Creative with Apply LUT on After the grade, and set its strength.
- 5
Export the look as a LUT
Open Export, choose LUT (.cube), set LUT size to 33 and choose Export .cube to use it in another editor.
Drop a video or photo to colour gradeChoose a video or photo to grade
Opens in the studio: looks and Auto colour for a quick result, wheels, curves, masks and scopes when you want more.It opens in the studio on your phone. Nothing is uploaded.
MP4, MOV, WebM, MKV, JPG, PNG, WebP
Free · no watermark · graded on your device, never uploaded