
Free · runs in your browser

Make a Video Black and White

Turn a colour clip into rich monochrome or a warm sepia tone, decide which colours become light or dark greys, and save it at full size without uploading it.

Drop a video to colour gradeChoose a video to grade

Or choose one from your computer. Try looks on your own footage before you save anything.Pick a clip from your photos or files. It stays on your phone.

Works with MP4MOVWebMMKVand more

Graded on your device. Your video is never uploaded.

  1. 1Choose
  2. 2Grade
  3. 3Download

To make a video black and white online, open it above: this page starts on the Classic Mono look, so the preview is monochrome straight away. Lower Intensity if you want a hint of colour to show through, or open All looks (L) and try the Black & white and Sepia & duotone categories for punchier contrast, softer greys and toned versions such as Warm Sepia. When it looks right, choose Export video.

Good monochrome is more than draining the colour out. Every hue has to become some shade of grey, and the choice of which colours turn light and which turn dark is what gives a black-and-white picture its depth. The Black and white control in Pro tools comes with Red mix, Green mix and Blue mix sliders for exactly that, explained below. To keep one colour and turn the rest grey, use the colour splash tool instead.

How to turn a video black and white

  1. Open the video

    Choose Select video or drop the file on the tool. The Classic Mono look is applied as soon as the first frame appears.

  2. Pick a monochrome style

    Press L for All looks, tap the Black & white chip and use the arrow keys to try each one on your own frame. Sepia & duotone holds the brown and tinted versions. Done closes the gallery.

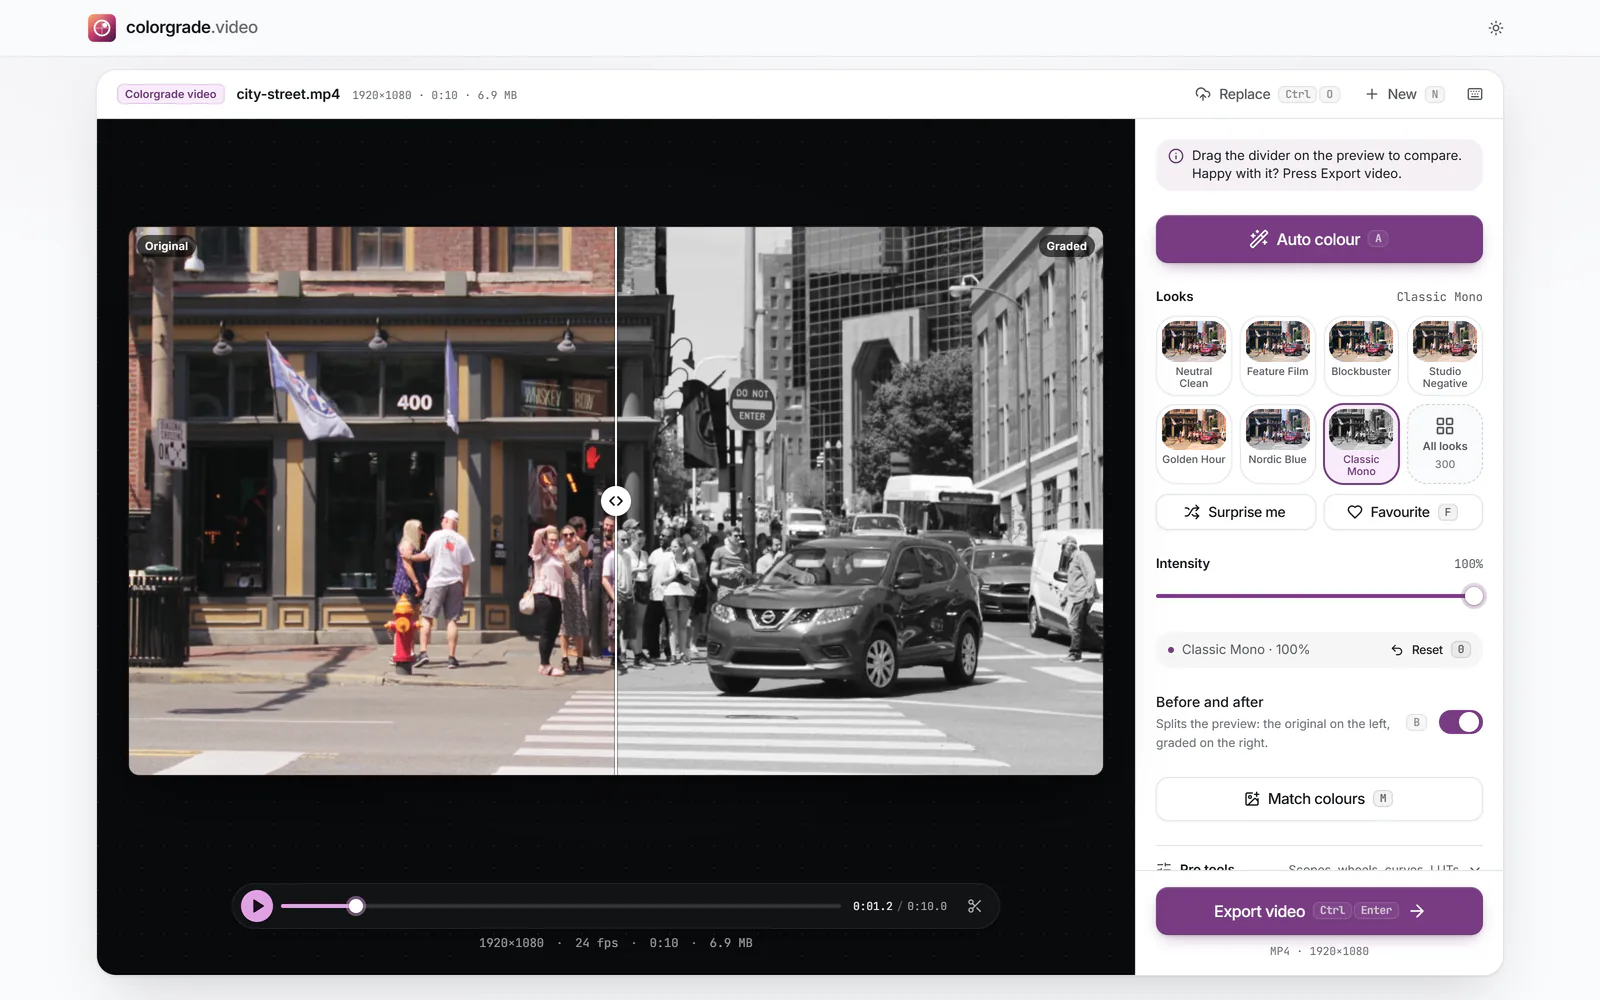
    Before and after with the Classic Mono look: the left of the street clip is in colour, labelled Original, and the right is black and white, labelled Graded, with Classic Mono selected in Looks (enlarge image)

    Classic Mono with Before and after on: colour on the left, black and white on the right.

  3. Shape the greys yourself

    For full control, open Pro tools (P), go to Effects, raise Black and white, then move Red mix, Green mix and Blue mix. Watch skin and sky as you go.

  4. Add texture and compare

    Grain and Vignette, also under Effects, suit a classic monochrome look. Press B for Before and after to check the conversion against the original colours.

  5. Export and keep the original

    Select Export video, then Download video. Keep your colour original as well: the exported file is grey and the colour can’t be recovered from it.

Turning colour into grey: why the mix matters

The simplest conversion throws the colour away and keeps only lightness. That can work, but it has a well-known flaw: two colours that look completely different can share the same lightness. A red flower among green leaves may become the same mid grey as the leaves and disappear. Video’s own formula for brightness, from the Rec.709 standard, weights green at roughly 72%, red at about 21% and blue at about 7%, which is why a plain conversion often renders blue skies pale and flat.

A channel mixer lets you choose the weights yourself. Raise Red mix and reds and oranges become lighter greys; lower Blue mix and anything blue drops towards black. The balance you choose is a creative decision, and it changes the mood far more than most people expect.

Colour filters, the way film photographers used them

  • Red filter (more Red mix, less Blue mix): blue skies go dark and dramatic, clouds stand out, skin turns pale and smooth, and foliage goes deeper.
  • Yellow or orange (a little more red and green, less blue): a milder version of the same, the classic choice for landscapes and street scenes.
  • Green filter (more Green mix): leaves and grass lighten, while lips and ruddy skin deepen, giving portraits a more rugged feel.
  • Blue filter (more Blue mix): skin turns deeper and blemishes show, haze and fog get heavier; useful for a moody, atmospheric look.

Sepia and other toned monochrome

Sepia began as a chemical toning process for photographic prints, used partly because it helped them last. The warm brown it gave became shorthand for the past. Warm Sepia in the Sepia & duotone category reproduces that tone, and the other looks there tint the greys in different colours, from cool steel to two-colour duotones.

You can build your own toned look too. Set Black and white to full, then add Shadow tint with Shadow tint amount and Highlight tint with Highlight tint amount; Tint balance decides where shadows end and highlights begin. Cool shadows with warm highlights is a classic split tone. Keep the amounts low: a whisper of colour reads as elegant, a strong one as a filter.

For an old-footage feel rather than a toned print, the vintage video filter page covers retro looks, and film look covers grain and film-stock colour.
On a phone, and the limits worth knowing

  • iPhone: in Photos, open the video, tap Edit, then the Filters button, and drag the slider to set the strength. Apple’s own guide names only a couple of filters, so look through the list on your iOS version for a monochrome one.
  • Android: in Google Photos, open the video and use Adjust, turning Saturation all the way down. The Effect options under Filters also include B&W Film.
  • Any phone: this page works in up-to-date mobile browsers and gives you the channel mix and sepia options that the built-in apps lack.

The conversion applies to the whole clip you export. There are no masks, so you can’t leave one person in colour; the colour splash tool can keep one band of colour across the frame instead. To change only part of the running time, trim to that section with the scissors button or I and O, export it, and join it back in your editor. Export re-encodes every frame, at the original size unless you choose a smaller one.

Black and white video questions

How do I make a video black and white on iPhone?

In Photos, tap Edit, then Filters, and choose a monochrome filter if your iOS version has one. For control over how colours turn grey, open this page in Safari, select the video and use Classic Mono or the Black & white looks, then Export video and save it with Share or Download video.

How do I make a video black and white on Android?

Google Photos can do it: open the video, choose Adjust and set Saturation to its minimum, or use the B&W Film effect. This page also runs in Chrome on Android and adds sepia, toning and the channel mixer.

How do I add a sepia tone to a video?

Open All looks (L), choose the Sepia & duotone category and pick Warm Sepia. Intensity sets how strong the tone is. For a custom tint, set Black and white to full and add Shadow tint and Highlight tint under Effects.

Can I make part of a video black and white?

By time, yes: trim the clip to the section you want with the scissors button or I and O, export it in black and white, and join it to the colour footage in an editor. By area, no: there are no masks, so the whole frame changes.

Can I turn it back to colour later?

Until you export, yes: lower Intensity, press Reset (0) or Undo. The exported file contains only greys, so keep your original colour video; no tool can bring the real colours back from a black-and-white file.

Black and white, grayscale, monochrome: what is the difference?

Grayscale means only neutral greys from black to white. Monochrome means a single colour in many tones, so sepia and blue-toned pictures count as well. In everyday speech, black and white covers both.

Does black and white make the file smaller?

Usually only slightly. Video stores colour at a lower resolution than detail anyway, so removing it saves less than you might think. The Quality and Size choices in Export settings matter much more.