
Free · runs in your browser

Change a Color in a Video

Turn a red jacket blue, calm a loud green wall or deepen a pale sky. The HSL tab works on one band of hues at a time, and the clip stays on your device.

Drop a video to colour gradeChoose a video to grade

Or choose one from your computer. Try looks on your own footage before you save anything.Pick a clip from your photos or files. It stays on your phone.

Works with MP4MOVWebMMKVand more

Graded on your device. Your video is never uploaded.

  1. 1Choose
  2. 2Grade
  3. 3Download

To change a color in a video, open the clip above: on this page the tool starts with Pro tools on the HSL tab. Choose the band nearest the colour you want to alter (Red, Orange, Yellow, Green, Aqua, Blue, Purple or Magenta), then drag Hue to turn it towards a new colour, Saturation to make it louder or quieter, and Luminance to make it lighter or deeper. Everything of that hue moves together while the rest of the frame is left alone.

This is colour replacement by hue, not by object. The tool has no idea where a jacket ends and a red shop sign behind it begins, so anything sharing the hue shifts as well. When the colour you want to change is the only one of its kind in the shot, the result is clean and convincing, and the sections below show how to check that first. To keep one colour and turn the rest grey, the colour splash page does it in one step; to make the whole picture more or less colourful, use video saturation.

How to change one colour in a video

  1. Open the clip

    Drop the file onto the tool or choose Select video. This page opens Pro tools on the HSL tab, with the scopes above it.

  2. Find the right band

    Click the band that matches the colour you want to change. Not sure which one? Push its Saturation right for a moment: whatever starts to glow is what that band covers.

  3. Shift hue, then settle the shade

    Drag Hue to swing the colour round the wheel, then use Saturation and Luminance until the new shade looks as if it was always there. Reset HSL clears every band if you lose track.

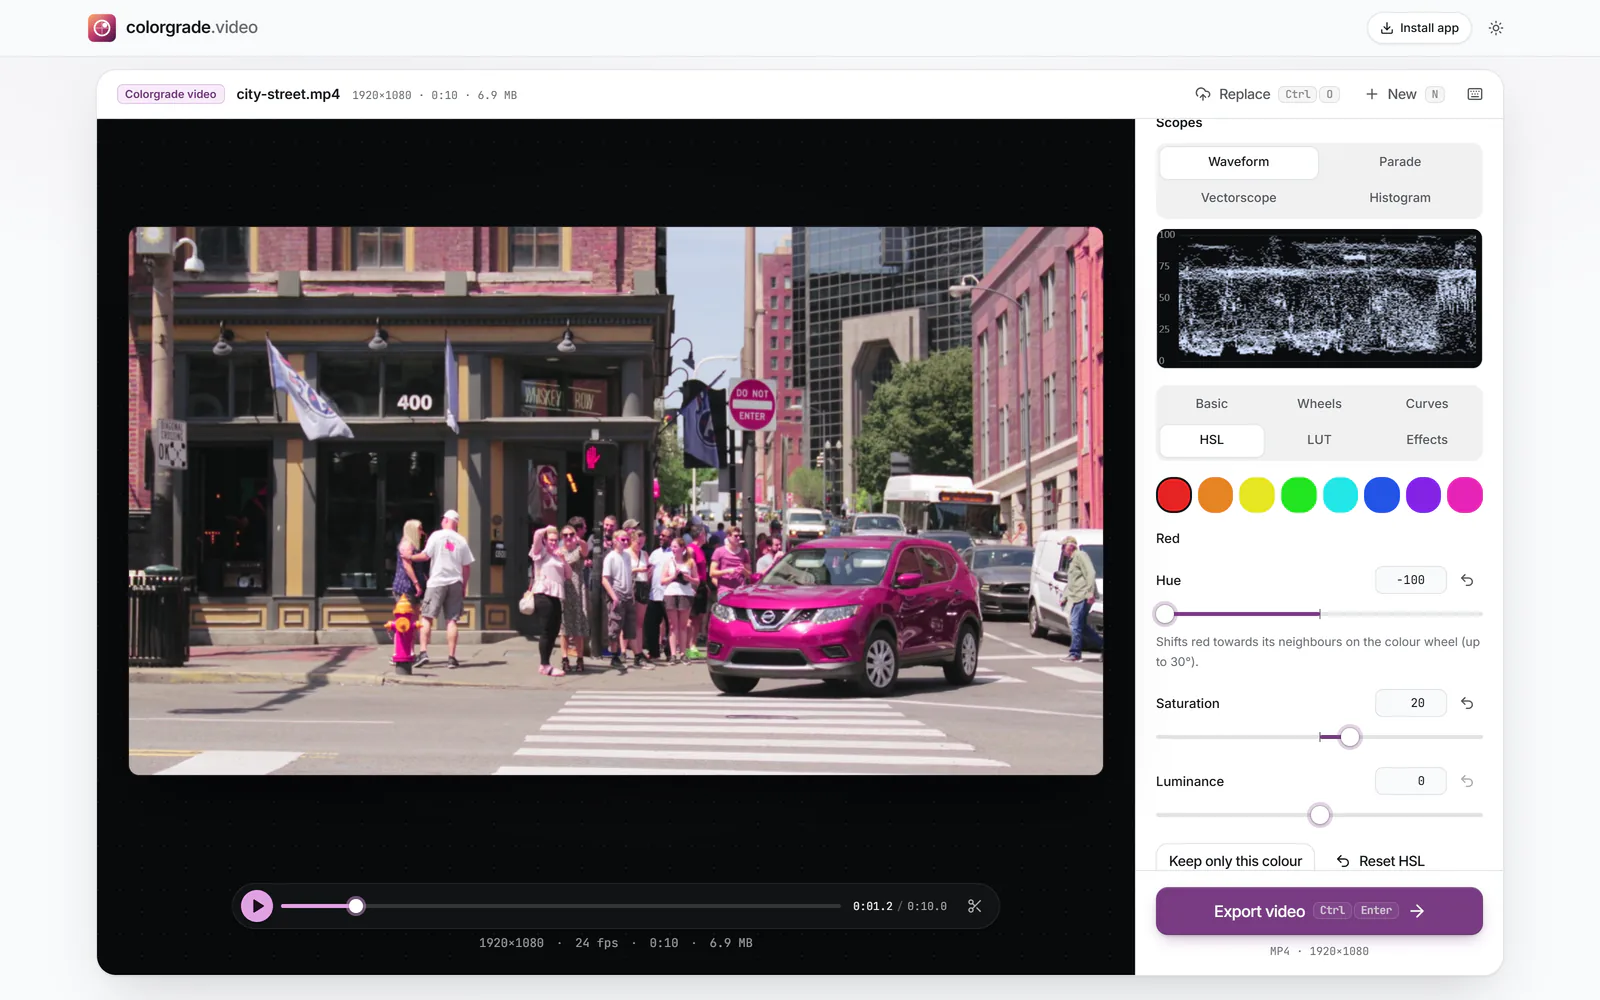
    Pro tools open on the HSL tab with the Red band chosen, Hue at −100 and Saturation at +20: the red car in the street clip has turned magenta while the rest of the scene is unchanged (enlarge image)

    The Red band with Hue pulled to −100 turns the red car magenta and leaves the rest alone.

    1. Colour bands
  4. Check edges and skin

    Turn on Before and after (B) and drag the divider across the area you changed. Play the clip through and watch the edges of the object and any faces in the shot.

  5. Export the result

    Choose Export video, then Download video once Your video is ready appears. Every frame is re-encoded with the new colour.

How hue, saturation and luminance split up a colour

HSL describes any colour with three answers. Hue is where it sits on the colour wheel, measured as an angle: red at one point, yellow a sixth of the way round, green a third, and so on. Saturation is how pure it is, from grey to fully vivid. Luminance is how light it is. Changing only the hue of a band keeps the shading, highlights and texture of the original, which is why a shirt recoloured this way still shows its folds.

Each of the eight bands covers a slice of the wheel rather than one exact shade. The band called Red also reaches the pinkish and slightly orange reds next to it, and Aqua sits between greens and blues, catching turquoise water and teal paint.

Why some swaps look real and others don’t

Colours of equal saturation are not equally light to the eye. A pure yellow looks far brighter than a pure blue, and a vivid green looks lighter than a vivid red. So when you swing a hue a long way, from red to blue for example, the new colour can look oddly glowing or oddly heavy. Fix it with Luminance: lower it after moving towards yellow or green, raise it after moving towards blue or purple. Small hue moves, such as nudging an orange-ish red into a cleaner red, rarely need any correction at all.
Choosing a colour that can be changed cleanly

  • One of a kind. The best targets are the only thing of their hue in the frame: a yellow kayak on a grey lake, a purple scarf in a street of muted coats.
  • Strong, not pastel. A saturated colour has a clear hue. Faded, greyish colours sit near the centre of the wheel, where hue is unreliable and the change can flicker from frame to frame.
  • Away from skin. Skin tones fall mostly in the Orange band, with some in Red. Shift those bands and faces change too, so check the skin tone line on the Vectorscope after any move there.
  • Even light. If the object moves from sunlight into shade, its hue drifts slightly and may slip partly into a neighbouring band.

Most phone and camera video stores colour at a lower resolution than detail: in the common 4:2:0 format, one colour sample covers a block of four pixels. That is invisible normally, but after a strong hue swap the edge of the object can show a thin rim of the old colour or a soft halo. Moderate moves hide it; extreme ones on small objects show it most.

What hue changes can’t do

There are no masks or object tracking here, and the change applies to the whole clip you export. You can’t recolour one of two red shirts, and you can’t give colour to something white, grey or black: a neutral pixel has no hue to rotate, so a white car stays white whatever the Red band does. For those jobs you need an editor with masks or a colour qualifier, such as the Qualifier palette on DaVinci Resolve’s Color page or HSL Secondary in Premiere’s Lumetri Color panel.

Once a change looks right, it travels: Copy grade (Shift+C) and Paste grade (Shift+V) carry it to your next clip, Save as my look keeps it in this browser, and Export .cube writes it as a LUT for other editors. The colour correction tool is the place to start if the whole picture needs fixing before you change any single colour.

Changing colours in a video: questions

Can you change the colour of an object in a video?

Yes, as long as its colour is not shared with anything else in the shot. The HSL controls change a band of hues wherever it appears, so a green bag can become blue cleanly unless the background is green too. White, grey and black objects can’t be recoloured this way because they have no hue.

How do I replace one colour in a video?

Open the clip on this page, choose the matching band on the HSL tab, and drag Hue until the colour turns into the one you want. Adjust Saturation and Luminance so it sits naturally, check it with Before and after, then select Export video.

What is HSL?

Hue, saturation and luminance: three ways of describing a colour. Hue is the position on the colour wheel, saturation is how intense the colour is, and luminance is how light or deep it is. HSL tools split the image into hue bands so each can be adjusted on its own.

Why does the new colour spill onto other things?

Because the selection is by hue, not by outline. Anything with a similar hue, such as a sign, a car or a reflection, sits in the same band and changes with your target. Pick a smaller hue move, or choose a clip where the target colour is unique.

Will changing a colour affect skin tones?

Only if you change Orange or Red, where skin lives. Moves in Green, Aqua, Blue or Purple leave faces alone. If you must change orange or red, keep the move small and check the skin tone line on the Vectorscope.

Can I use the same colour change on other clips?

Yes. Copy grade stores it and Paste grade applies it to the next video you open in this browser. Export .cube saves it as a LUT you can load in DaVinci Resolve, Premiere, Final Cut Pro or CapCut desktop.

Is the video uploaded while I edit it?

No. The colour change is calculated by your browser on your own device, and the exported file is saved straight to it.