Chapter 6 of 13 · Intermediate · 9 min read
Secondary Color Correction: Qualifiers and Power Windows
A primary correction changes the whole picture at once: white balance, contrast, overall saturation. A secondary correction changes only part of it: one range of colours, one area of the frame, or the overlap of the two. It is how a colourist deepens a sky without turning faces blue, calms a shirt that shouts louder than the person wearing it, or lifts a face that the sun left in shadow.
Secondaries come after the primaries, not instead of them. If the whole frame is too warm, fix it with white balance and the colour wheels first; a secondary used to patch a global problem leaves hard edges where the patch stops. Once the picture is balanced, secondaries deal with what is left over.
In the studio, secondaries live in the Secondary panel in Pro mode and always work on a layer of their own. This chapter covers how a qualifier builds a key, how power windows shape it, how to judge the result with the Highlight and Matte views, and the honest limits of working without a tracker.
Video guide
How to Use a Qualifier and Power Window in Grading
Chapters
Primary versus secondary correction
There are three ways to change only some of the colours in a frame, and they suit different jobs. Hue curves and the HSL bands in Curves act on a colour family everywhere it appears, with no selection to manage; that is the right tool for nudging all the greens in a landscape or swapping a hue. A qualifier builds an explicit selection that you can see, refine and grade with any control. A window selects by position instead of by colour.
| Tool | Selects by | Best for | Weak at |
|---|---|---|---|
| Hue curves / HSL | Colour family, globally | Shifting all greens or all blues a little | Separating two objects of similar colour |
| Qualifier | Hue, saturation, luminance | Sky, a shirt, skin, one coloured object | Colours that also appear elsewhere |
| Power window | Position and shape | Faces, vignettes, part of the sky | Subjects that move a lot |
| Qualifier + window | Both at once | One coloured thing in one place | Fast camera moves |
A useful rule: if the change would look right on every pixel of that colour, use a curve. If it should only affect one object, or one area, build a secondary.
How a qualifier builds a key
A qualifier is a colour key, like a green screen key but aimed at any colour. Switch on Use qualifier, then choose Pick colour and click the thing you want to select; Shift-click other parts of it to widen the range. The presets Skin, Sky and Foliage give sensible starting ranges for the three things people most often isolate.
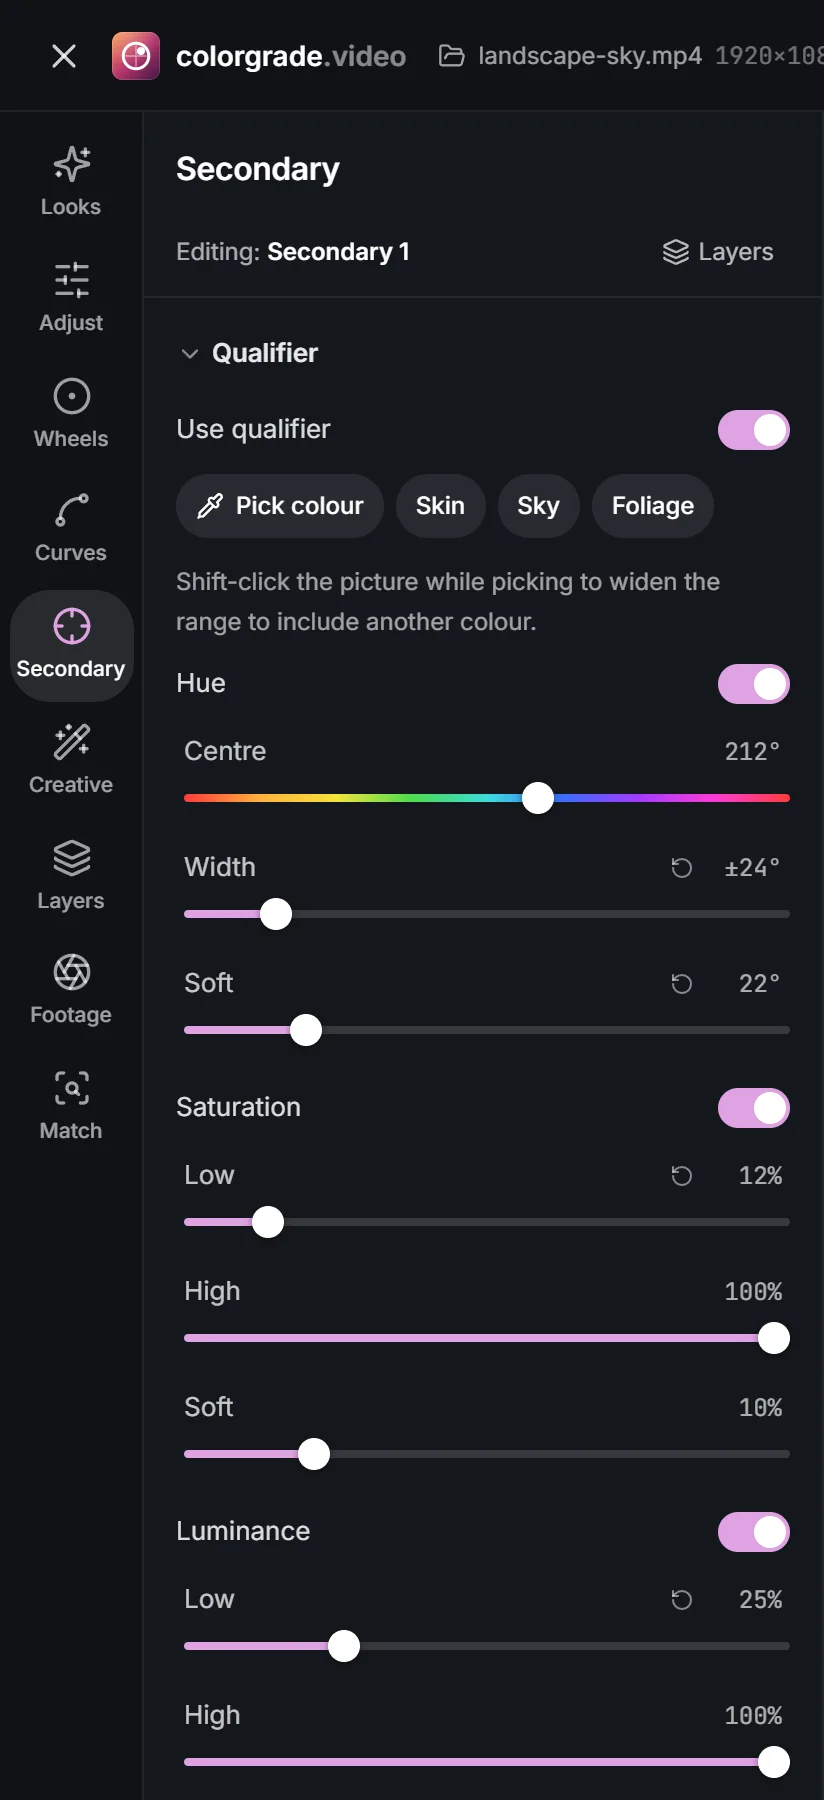
Under the hood the key is three tests, one per dimension, each with its own on/off switch:
- Hue: a centre and a Width, measured round the colour wheel. This does most of the work. Greys have no hue, so they never match a hue range, which is why a sky key leaves white clouds alone.
- Saturation: a Low and High limit. Raising Low drops pale, nearly grey pixels of the right hue, such as haze on the horizon.
- Luminance: a Low and High limit on Rec.709 luma. Use it to keep the key out of deep shadow, where colour is mostly noise, or to select only the lit side of an object.
 (enlarge image)
The qualifier: Hue, Saturation and Luminance ranges, each with Soft, plus Clean black and Clean white.
Each range also has a Soft control, which ramps the selection in and out instead of cutting it at a hard threshold. Softness matters more than precision. Video noise moves a little every frame, so a pixel sitting right on a hard edge flips in and out of the key and the boundary fizzes when the clip plays. A soft edge turns that flicker into a gentle blend nobody notices.
 (enlarge image)
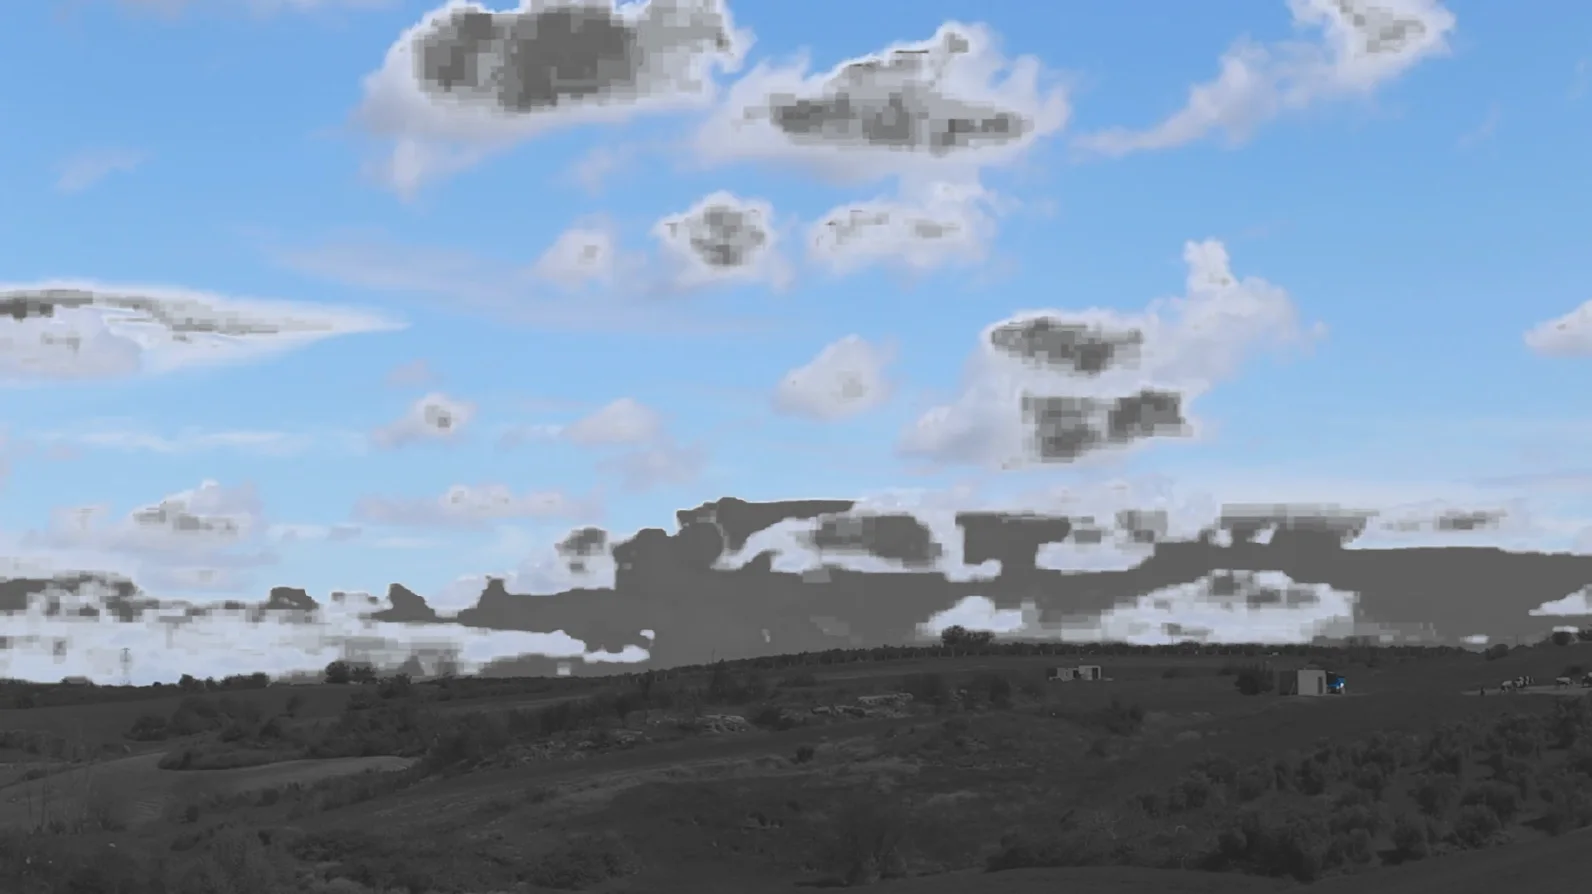
The Sky preset in Highlight view: selected pixels in colour, the rest grey. Clouds drop out because greys have no hue.
Matte finesse: clean black and clean white
Real keys are rarely clean. A few stray pixels in the background half-match, and the selected area has holes where a reflection or a shadow fell outside the range. Clean black pushes weak, partial selections back to nothing, removing the speckle outside; Clean white pushes nearly selected pixels to fully selected, filling holes inside. Use small amounts: too much of either turns a soft edge back into a hard one.
Judge the matte, not the picture
Set Show mask to Highlight to see the selection in colour with everything else grey, or to Matte for pure black and white, where grey means partly selected. Build the key in one of these views, play the clip through, then switch back to Off to grade. A key that looks fine on a still frame often breaks on the frames where the subject turns or the light changes.
Power windows: shape, feather, invert
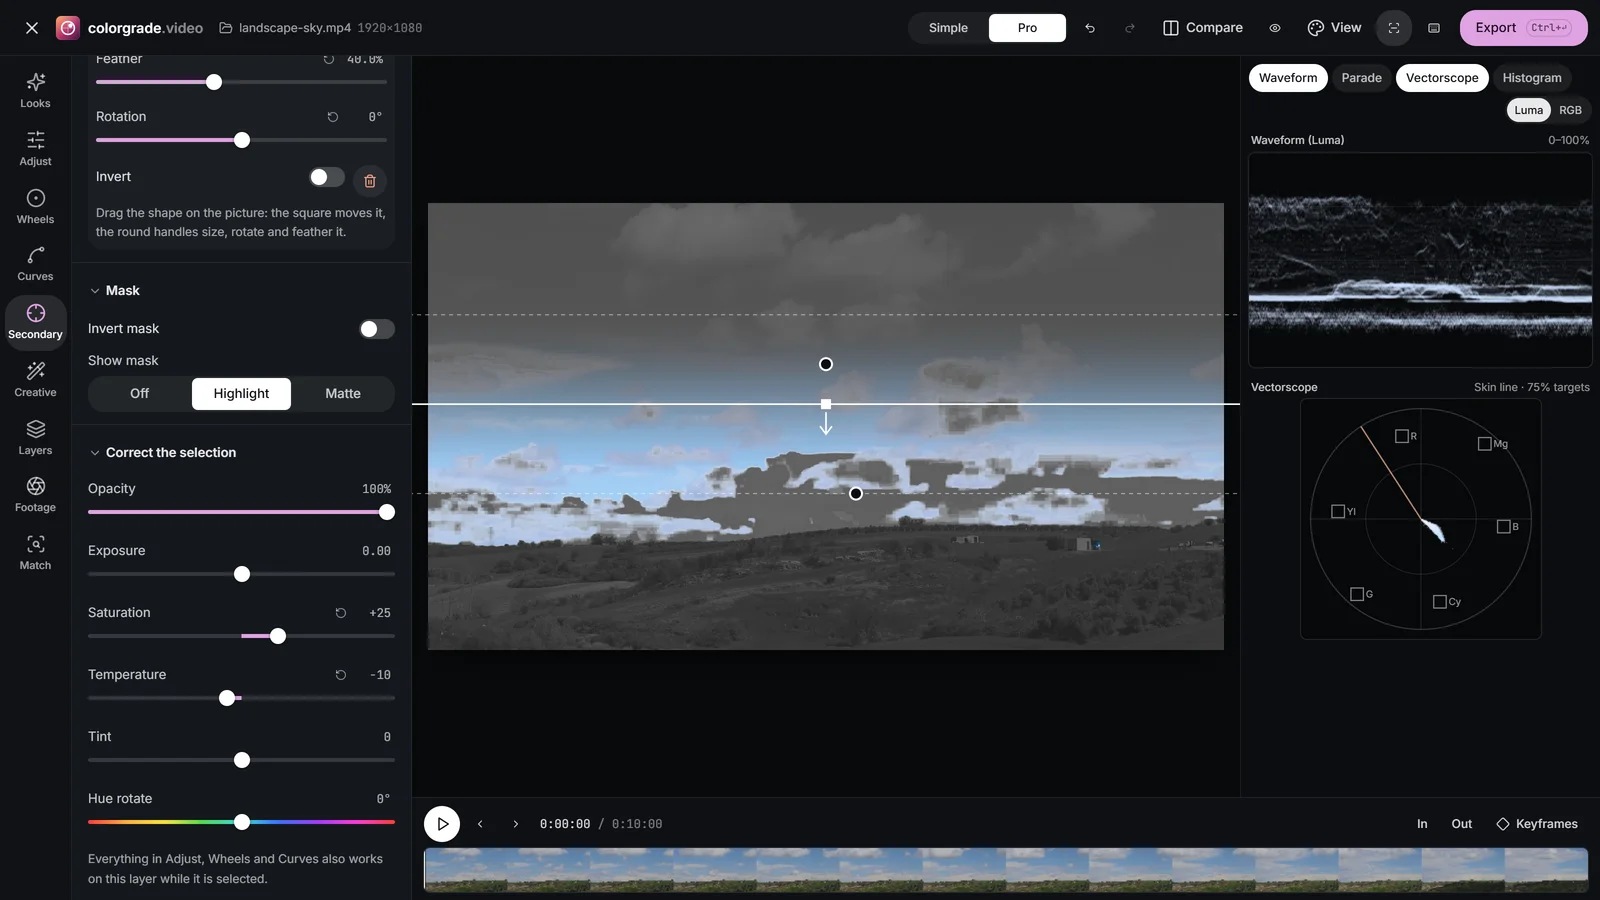
A power window is a shape drawn on the picture that limits the correction to an area. Add a Circle, Rectangle, Gradient or Polygon, then drag it on the picture: the centre to move it, the edges to resize it, the handle to rotate it. For a Polygon, drag the points, and click the edge to add one. Gradient is a straight line with a soft transition, the digital version of a graduated filter on a lens, and is the usual tool for a sky.
- Feather softens the edge. Be generous: a correction that fades over a fifth of the frame is invisible, while a crisp edge looks like a spotlight.
- Invert on a window selects everything outside it, which is how a vignette is made. Invert mask inverts the whole selection, qualifier and windows together.
- Several windows combine as a union: a pixel is selected if it is inside any of them. Two overlapping circles can cover a face and a hand.
- Windows and the qualifier combine as an intersection: a pixel must be inside a window and match the qualifier. The window then acts as a garbage matte, stopping a sky key from catching a blue car lower in the frame.
 (enlarge image)
A feathered Gradient window limits the sky key to the top of the frame, like a graduated filter.
If you have used DaVinci Resolve, this is its Qualifier palette and Power Windows, with matte finesse trimmed to the two controls that matter most. In Premiere Pro the qualifier is Lumetri’s HSL Secondary section, which keys by hue, saturation and lightness and has a colour/grey preview; its windows are masks drawn on the Lumetri effect.
Why every secondary gets its own layer
When Correction or Look is selected, the Secondary panel offers Add a secondary layer. That creates Secondary 1 in Layers and selects it; the chip at the top of Adjust then reads Editing: Secondary 1. Everything you change now affects only the masked pixels: the quick sliders in the panel (Exposure, Saturation, Temperature, Tint, Hue rotate), and also Adjust, Wheels and Curves while this layer stays selected.
Separate layers are what make secondaries safe. You can switch one off to check what it does, lower its Opacity to fade it, rename it ("sky", "jacket") so you know what it is a week later, or delete it, without disturbing the primary underneath. It is the same reason Resolve users give each secondary its own node. Layers apply in order from top to bottom, so a secondary placed above Look is corrected before the look goes on, which is usually what you want: fix the sky, then style the whole frame.
You can add up to 12 layers, of which up to 6 can carry a mask. In practice three or four secondaries is plenty for one shot; more usually means the primary needs another look.
Five jobs secondaries do well
- A sky. Sky preset, a soft Gradient to keep the key above the horizon, then a little Saturation and a slightly cooler Temperature. Lowering Exposure a fraction on this layer brings back cloud detail.
- A shirt colour. Pick colour on the shirt, Shift-click its shadowed folds, then raise the Low limit of Saturation so pale background pixels of the same hue fall out. Use Hue rotate to correct a brand colour, or Saturation to stop a neon top stealing attention.
- A face lift. A large, well-feathered Circle over the face and a third of a stop of Exposure acts like a bounce card. Add the Skin qualifier if the background is close in tone; the skin tones chapter goes further.
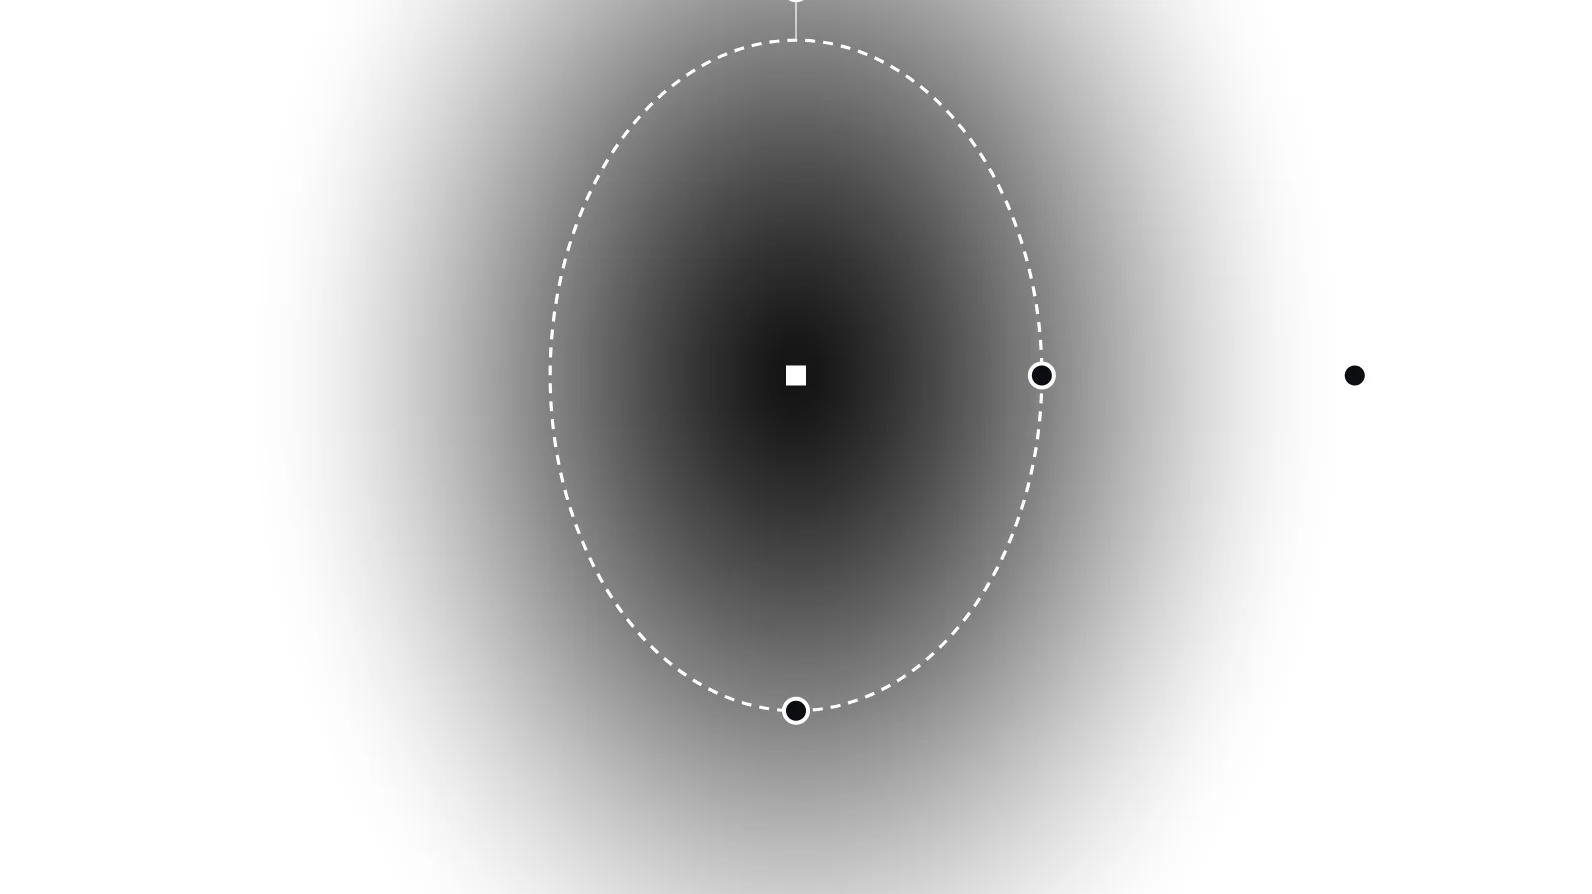
- A vignette. A Circle with Invert on, wide Feather, and Exposure lowered a little. Unlike the Vignette in Creative (see building a creative look), you can place it off-centre over the subject.
- Mixed lighting. When a window lights one side of a room blue and a lamp lights the other orange, qualify the warm-lit area by hue and luminance and cool it with Temperature until the two sides agree.
 (enlarge image)
An inverted Circle in Matte view: the white area will be corrected, making an off-centre vignette.
Limits: windows do not track
Desktop grading applications can track a window: they follow the face across the frame by analysing motion. The studio does not. A window stays exactly where you put it for the whole clip, so if the subject walks out of it the correction stays behind on the wall.
That limits windows more than it limits secondaries. A few ways to work with it:
- Let the qualifier do the following. A key follows the colour wherever it goes, so for a moving red car a qualifier alone, or with a very large window, works fine.
- Keep windows large and soft. A face that drifts within a generous, heavily feathered circle never reaches the edge.
- For slow, small moves, use Keyframes: Animate the grade, set the start grade with the window in its first position, then choose Editing: End and move the window to where the subject ends up. Be clear about what this does: the picture dissolves from one grade to the other, so the window fades out in one place and in at the other rather than sliding. It only looks right when the two positions overlap heavily.
- For fast or long moves, cut the clip into shorter pieces in your editor, or do that shot in an application with a tracker.
Qualifiers have limits too. They cannot tell two objects of the same colour apart, and heavily compressed video, with colour stored at a quarter of the picture’s resolution, gives blocky edges on saturated colours. Softness and Clean black help; when they don’t, a hue curve with no hard edge at all is often the better choice.
Try it: grade only the sky
Isolate the sky with a qualifier and a gradient window on its own layer, check the matte, then deepen the blue without touching the land.
- 1
Add a secondary layer
Switch to Pro, open Secondary and choose Add a secondary layer. Secondary 1 appears in Layers and is selected.
- 2
Key the sky
Turn on Use qualifier and choose the Sky preset, or Pick colour and click the sky, Shift-clicking any patch it missed.
- 3
Check the matte
Set Show mask to Highlight. Widen Width or add Clean black until the sky is solid and the land is grey, then play the clip.
- 4
Limit it with a window
Add a Gradient, drag it so it fades out just below the horizon, and raise Feather until the transition disappears.
- 5
Make the correction
Set Show mask to Off, then raise Saturation and lower Temperature slightly. Use Compare, Split to check the result against the original.
Drop a video or photo to colour gradeChoose a video or photo to grade
Opens in the studio: looks and Auto colour for a quick result, wheels, curves, masks and scopes when you want more.It opens in the studio on your phone. Nothing is uploaded.
MP4, MOV, WebM, MKV, JPG, PNG, WebP
Free · no watermark · graded on your device, never uploaded