
Free · runs in your browser

Fix White Balance in Video

Click something that should be white or grey and the colour cast disappears. The same Temperature and Tint sliders also warm a scene up or cool it down when that is the mood you want.

Drop a video to colour gradeChoose a video to grade

Or choose one from your computer. Try looks on your own footage before you save anything.Pick a clip from your photos or files. It stays on your phone.

Works with MP4MOVWebMMKVand more

Graded on your device. Your video is never uploaded.

  1. 1Choose
  2. 2Grade
  3. 3Download

To fix white balance in a video, open it above, press Pick white (W) and click something in the frame that should be white or neutral grey, such as paper, a shirt, a wall or a cloud. Temperature and Tint are set to cancel the cast, and the whole clip follows. If nothing in the shot is neutral, Auto colour (A) estimates the balance from the frame as a whole instead.

The same two sliders work in the other direction too: move Temperature towards amber to warm a scene, or towards blue to cool it. For a styled result, the Warm and Cool categories in All looks hold ready-made looks such as Golden Hour and Nordic Blue. If the cast is part of a broader problem, start with color correction; for blue-green water, the underwater page is the better fit.
How to fix white balance in a video

  1. Open the clip

    Choose Select video or drop the file on the tool. Pro tools opens on the Basic tab, where the white balance controls live.

  2. Click something neutral

    Press Pick white (W), then click a surface that should have no colour of its own. Avoid lamps, reflections and anything already pure white in the picture, since they hold no information about the cast.

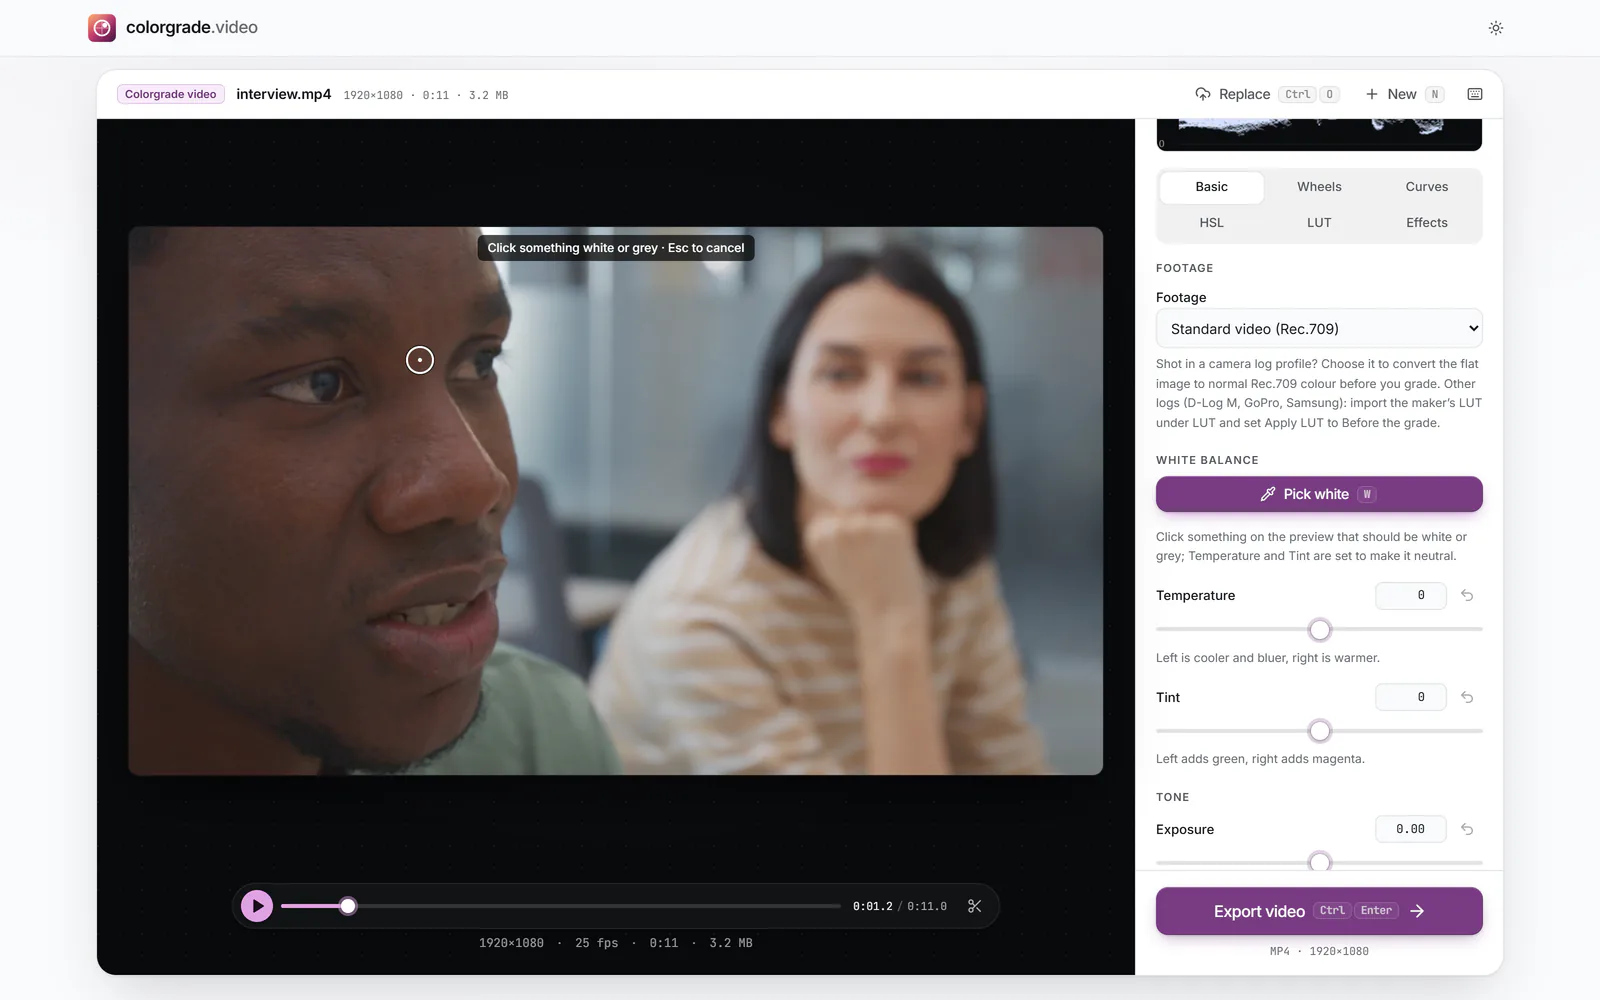
    Pick white switched on over an interview clip: a round crosshair sits on the preview with the hint “Click something white or grey · Esc to cancel”, and Pro tools shows the Basic tab with Footage, Pick white, Temperature and Tint (enlarge image)

    Press Pick white (W), then click something on the preview that should be white or grey.

    1. Pick white
  3. Fine-tune by eye and by scope

    Nudge Temperature (blue to amber) and Tint (green to magenta). On the Parade, the red, green and blue traces over a neutral area should line up.

  4. Warm or cool it on purpose

    For a mood rather than a fix, push Temperature a little further, or open All looks (L) and try Warm or Cool, adjusting Intensity to taste.

  5. Compare and export

    Check with Before and after (B), then choose Export video and Download video.

Why video turns yellow, blue, green or orange

Light sources have their own colour. Household bulbs and candles are orange-yellow, typically around 2,700 to 3,200 kelvin; midday daylight is roughly 5,500 to 6,500 K; open shade under a blue sky can climb well beyond 7,000 K. Your brain quietly compensates for all of this, which is why a white page looks white to you in every room. A camera has to guess, and when it guesses wrong the whole recording takes on the colour of the light.

  • Yellow or orange: indoor bulbs, candles, street lamps, or a camera locked to daylight balance indoors.
  • Blue: shade, overcast days, snow, early morning, or a camera locked to tungsten balance outside.
  • Green or magenta: some fluorescent tubes and cheap LED panels emit an uneven spectrum that leans green, which the warm-cool axis alone can’t fix.
  • Shifting colour mid-clip: the camera’s automatic white balance re-guessing as you move from one light to another.

That is why there are two sliders. Temperature moves along the blue to amber line that natural light follows, and Tint handles the green to magenta errors that artificial light adds.

How a click removes a cast

A neutral surface reflects red, green and blue equally, so if the camera recorded it with more red than blue, that difference came from the light. Correcting white balance means scaling the three channels until that surface is neutral again, and because the light fell on everything in the scene, the same scaling fixes everything else as well. Pick white measures the patch you click and sets Temperature and Tint to the values that neutralise it, so you can still see and adjust them afterwards.

Choosing a good reference

  • Pick something lit by the same light as your subject. A white wall in the sun says nothing about a face in the shade.
  • Choose mid to light grey rather than the brightest white in the frame. Very bright areas may have one channel clipped, which skews the reading.
  • Avoid coloured “whites”, such as cream paint, ivory fabric or white objects under a coloured reflection.
  • If several clicks give different answers, the scene has mixed light; choose the reading taken from near the faces.

When one white balance isn’t enough

A white balance correction applies to the whole frame and the whole exported clip. That covers the usual case, but some footage needs more:

  • Mixed lighting, such as a window on one side of a face and a lamp on the other. Balance for the side that matters; the other side will stay warm or cool, which often looks natural.
  • Clips where the camera’s auto white balance drifted. Trim the clip into steady sections with the scissors button or I and O, and balance each one.
  • A green tinge left on skin after the overall fix. The HSL tab’s Orange band covers most skin tones; a small Hue shift there cleans it without changing the rest.
  • Underwater footage, where red light is absorbed rather than tinted. Balance helps, but the reds need restoring too.

White balance questions

Can you fix white balance in post?

Yes, in most cases. As long as no colour channel is clipped, scaling red, green and blue afterwards gives nearly the same result as setting it correctly in camera. Heavily compressed or 8-bit clips tolerate smaller corrections than high-quality originals.

Why does my video look yellow?

It was most likely filmed under warm indoor lighting with the camera’s white balance set for daylight, or with auto white balance that didn’t fully adjust. Use Pick white on something neutral, or move Temperature towards blue.

Why does my video look blue?

Shade, overcast skies, snow and dusk all have bluish light, and cameras often leave some of it in. Click a neutral surface with Pick white, or move Temperature towards amber until skin looks healthy again.

How do I make a video less orange?

Move Temperature towards blue, or click a white object with Pick white. If a little orange remains only on skin, lower Saturation for the Orange band on the HSL tab rather than cooling the whole picture.

How do I make a video warmer?

Drag Temperature towards amber, or open All looks and pick from the Warm category, such as Golden Hour, adjusting Intensity until it feels right.

Why is there a green tint in my video?

Usually fluorescent tubes or low-quality LED lights. Temperature won’t remove it because it lies on a different axis. Move Tint towards magenta, or let Pick white set both at once.

Can I reuse a white balance on other clips?

Yes. Choose Copy grade (Shift+C), open the next clip and choose Paste grade (Shift+V). That suits clips shot in the same place under the same light.