Chapter 13 of 13 · Basics · 8 min read
Color Grading Mistakes and How to Fix Them
Most grades that look amateur fail in the same handful of ways. The good news is that almost every one of them shows up on a scope before it shows up in a viewer’s reaction, so once you know what to look for you can catch them yourself. This chapter lists ten common colour grading mistakes. For each one you get what it looks like, how to spot it on the scopes and the fix in the studio.
You don’t need to have read the rest of the tutorial to use it, but each fix links to the chapter that covers it properly. If the scopes are new to you, start with video scopes: every check below uses them. The cheat sheet at the end puts the whole list in one table.
Video guide
Color Grading Mistakes and Fixes: Saturation, Clips, Skin
Chapters
Mistakes before you start
1. Grading before correcting
- What it looks like: a look that behaves differently on every shot, skin that is strangely green or magenta under an otherwise attractive grade, and a colour cast that survives every look you try.
- On the scopes: in neutral areas such as a grey wall or a white shirt, the Parade traces sit at different heights, and the centre of the Vectorscope trace leans away from the middle.
- The fix: switch the Look row off in Layers, balance the Correction layer first with Auto colour, Pick white, Temperature and Tint, then switch the look back on. The workflow chapter explains why the order matters.
2. Judging by eye on an uncalibrated screen
- What it looks like: a grade that looked right last night looks heavy in the morning, or right on your laptop and wrong on everyone else’s. Screens differ, rooms change, and your eyes adapt to whatever they see for long enough.
- On the scopes: the scopes are the fix: they measure the picture’s values, so they read the same on any screen and at any time of day.
- The fix: switch to Pro so the scopes are always visible, turn off auto-brightness and warm night-time modes while you grade, keep the room light steady, and take short breaks so your eyes reset. Use Bypass (Shift+D) often to remind yourself of the original.
Tonal mistakes
3. Crushing the blacks or clipping the whites
- What it looks like: shadows that turn into flat black shapes with no texture, skies and windows that become flat white patches, and hard edges where detail ends. Pushing contrast for drama is the usual cause.
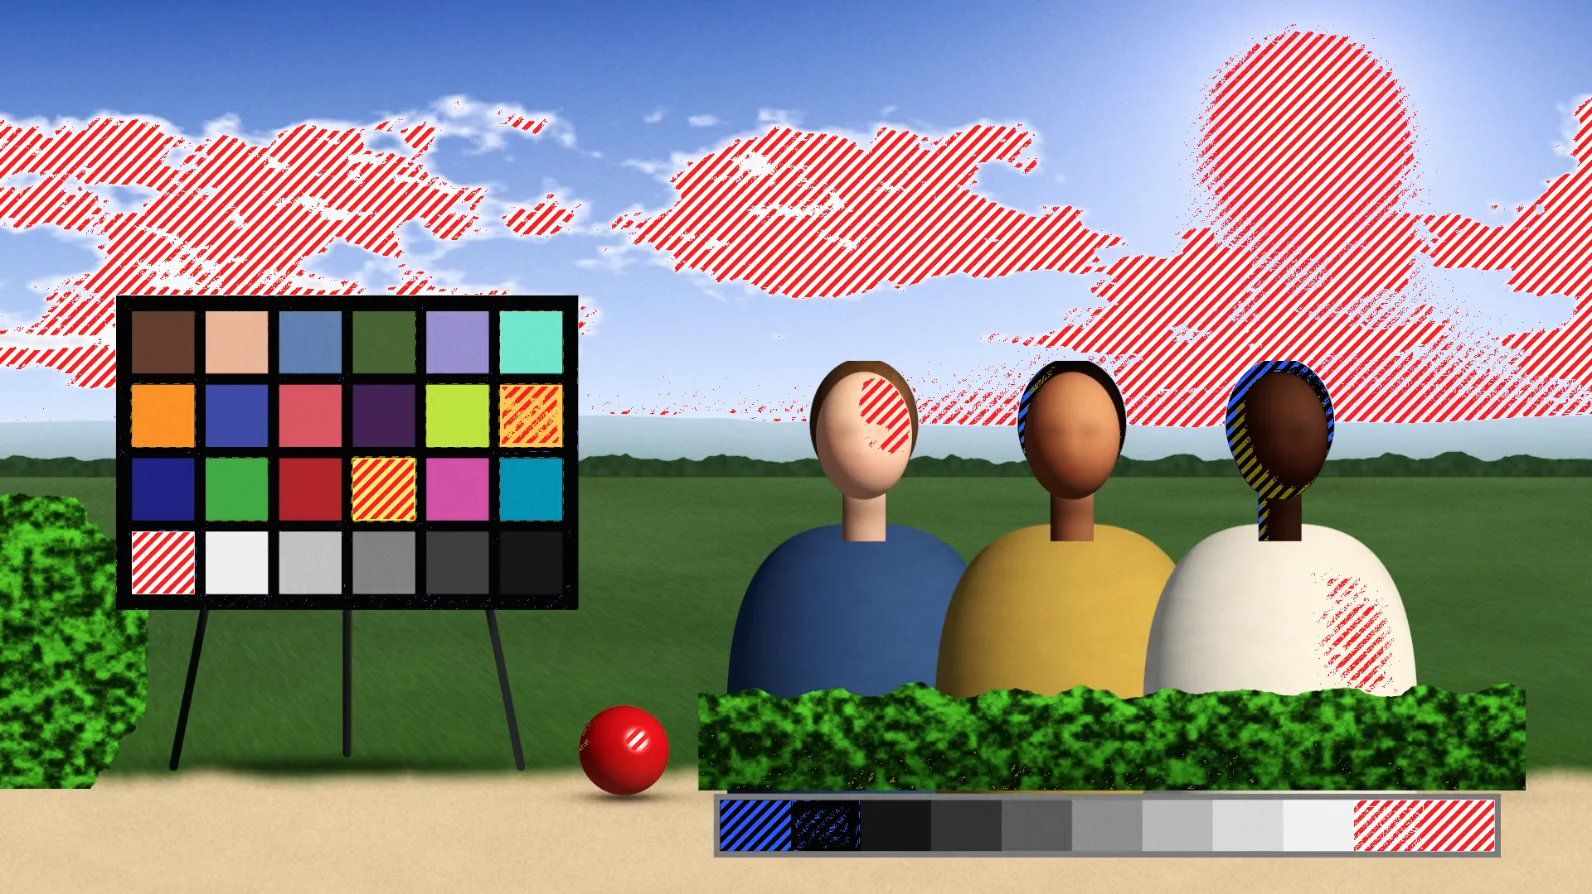
- On the scopes: the Waveform trace flattens into a hard line at 0% or 100% and the Histogram piles up against one edge. Set View to Clipping for red stripes where a channel is at 100% and blue where everything is at 0, or False colour for purple crushed blacks and red clipped areas.
- The fix: ease back Contrast, raise Blacks or lower Whites until the line just lifts off the edge, and use Highlights and Shadows to recover detail without flattening the whole image. For log footage, keep the Footage panel’s Highlights on Soft roll-off. See contrast and tonal range.
Deep blacks are not a mistake in themselves. A night scene or a moody interior can have plenty of true black; what matters is that you chose it and that nothing important, a face, an eye, the texture of a jacket, disappears into it.
 (enlarge image)
View on Clipping shows exactly where detail has been crushed or clipped.
Colour mistakes
4. Over-saturation and neon skin
- What it looks like: colours that glow rather than sit in the scene, red and orange areas that lose their texture and bleed, and faces that look sunburnt or orange.
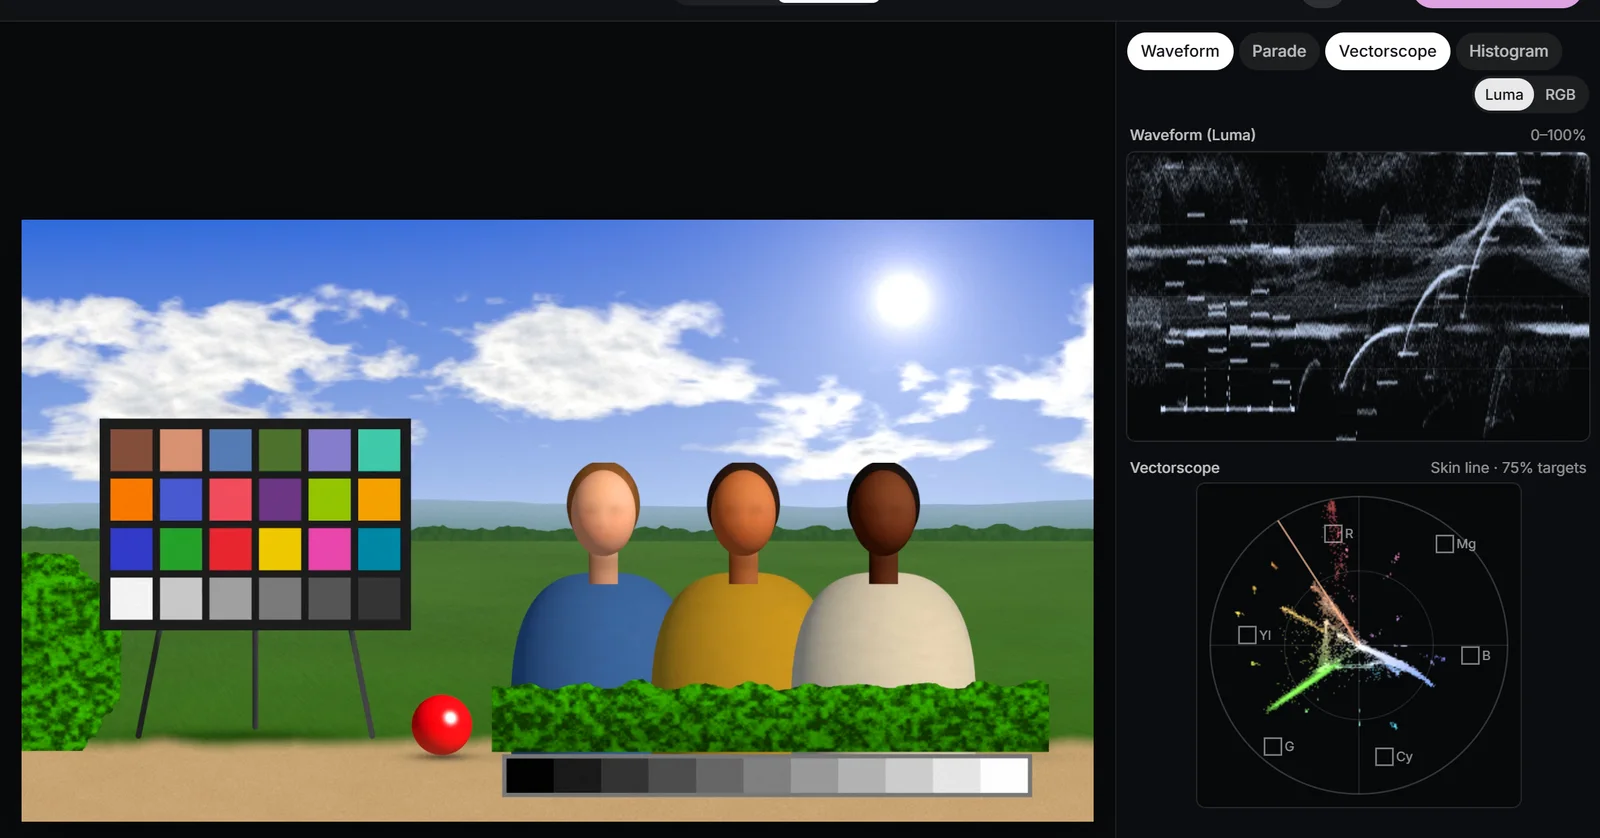
- On the scopes: on the Vectorscope, the trace stretches out towards or past the 75% colour-bar targets, and the skin lobe reaches far along the skin tone line. For natural footage, a trace beyond the targets is a warning sign, not a hard rule.
- The fix: use Vibrance instead of Saturation, since it protects colours that are already strong. Colour boost below zero in Wheels calms the most saturated colours, and Hue vs Sat in Curves turns down one colour. See video saturation.
 (enlarge image)
Too much Saturation: the Vectorscope trace runs past the 75% targets.
5. Orange-and-teal on everything
- What it looks like: every video gets the same blockbuster palette whatever its story: grass turns teal, skin turns orange, and a quiet family video looks like a trailer.
- On the scopes: the Vectorscope splits into two lobes pointing in opposite directions, towards orange and towards cyan, with little in between, and greens are pulled away from their natural angle.
- The fix: choose a look for the scene, not by habit. If teal and orange is right, lower Intensity and raise Protect skin tones so faces stay natural. The teal and orange page shows it done with restraint, and creative looks covers the alternatives.
6. Ignoring skin tones
- What it looks like: a grade that is beautiful on the background and makes people look ill: a little green, grey or magenta in the face. Viewers forgive almost any colour on a wall, but not on a face.
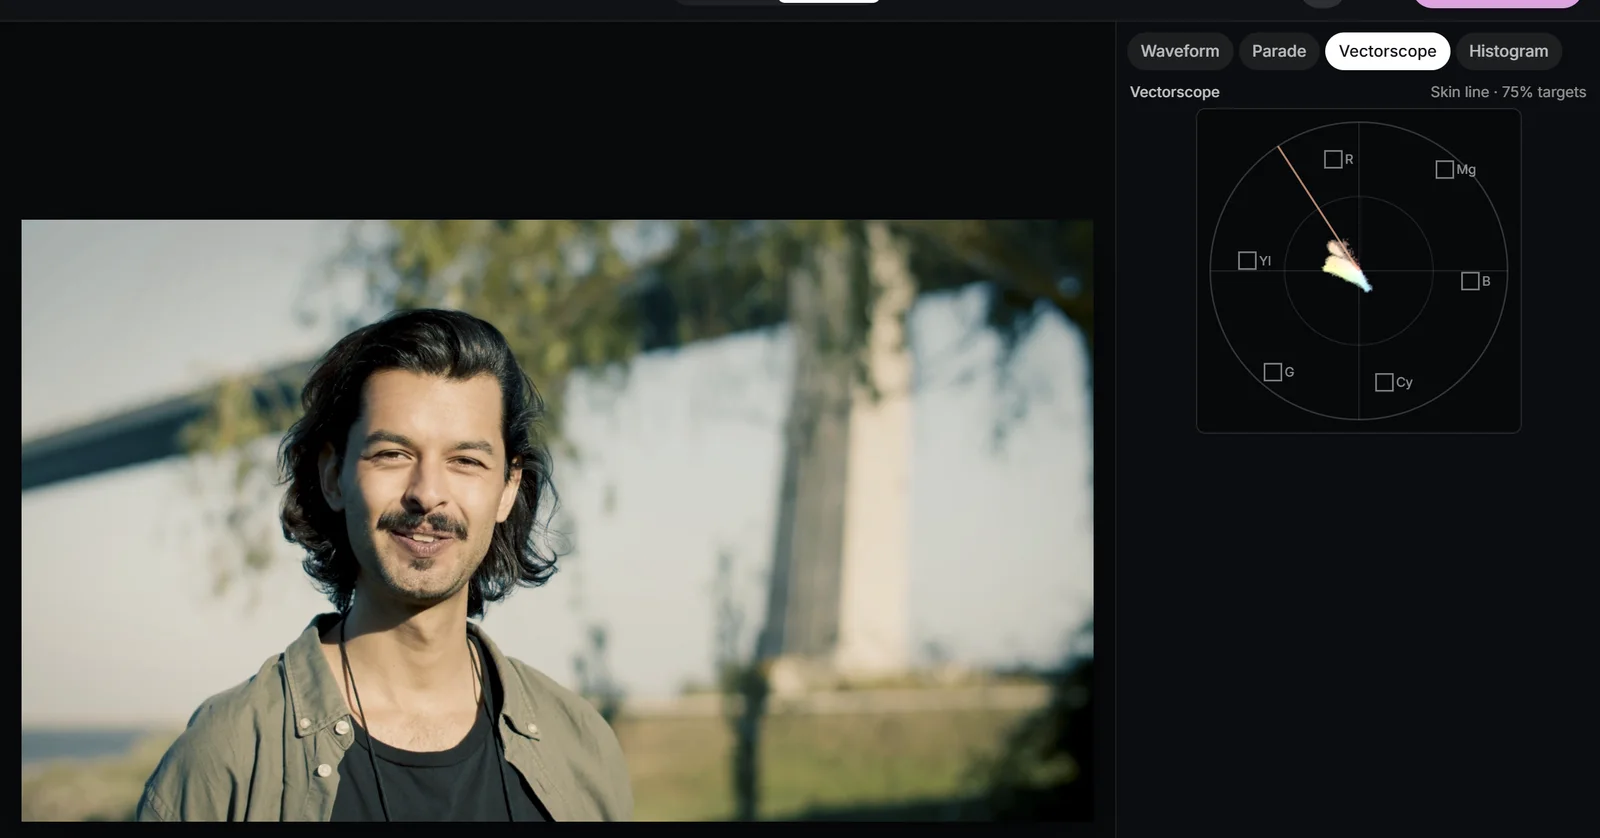
- On the scopes: the skin lobe on the Vectorscope points away from the skin tone line, towards green on one side or magenta on the other. Skin of every complexion sits near the same line; darker and lighter skin differ mainly in lightness and saturation, not hue.
- The fix: correct with Tint or the Gamma wheel if the whole shot is off. If only the look moves skin, raise Protect skin tones, or add a secondary layer with the Skin qualifier and fix it there. See skin tones.
 (enlarge image)
A strong look at full Intensity pulls skin along and off the skin tone line.
Technical mistakes
7. A LUT on log without a conversion, or a conversion twice
- What it looks like: a creative LUT on unconverted log footage gives a pale, flat picture with odd hues. Converting twice, with Footage set to the camera’s profile and the maker’s conversion LUT as well, gives harsh contrast, heavy saturation and clipped ends.
- On the scopes: unconverted log huddles in the middle of the Waveform with nothing near 0% or 100%; a double conversion slams the trace into both edges.
- The fix: convert once: either set Footage to the camera profile, or import the maker’s LUT with Apply LUT on Before the grade and leave Footage on Standard video (Rec.709). Creative LUTs go After the grade. If the camera already burned a LUT into the file, it is no longer log. See log footage and LUTs.
8. Forgetting the delivery gamma
- What it looks like: the grade looks right in the studio but lighter and flatter on one screen, heavier on another, or different in one particular player.
- On the scopes: nothing: the scopes measure the values in the file, not how a screen shows them, which is exactly why this one catches people out.
- The fix: decide who will watch and on what. For log footage, leave Output in the Footage panel on Rec.709 unless your project needs another curve, export, and check the exported file on a phone and a second screen. Don’t bend the grade to suit one player. See delivery.
Consistency and texture mistakes
9. Mismatched shots
- What it looks like: each shot looks fine alone, but the scene jumps at every cut: a face warms and cools, the room changes contrast between the wide and the close-up.
- On the scopes: compare the shots: the bottoms and tops of the Parade traces sit at different heights on the same neutral object, or the skin lobe points to a different angle on the Vectorscope.
- The fix: pick a hero shot, use Grab still and Show as reference in Match, run Match colours for a first pass, then trim by hand. Share the look with Copy grade and Paste grade. See shot matching.
10. Too much grain or vignette
- What it looks like: grain that becomes the subject and turns into blotchy noise after upload; a vignette that reads as a dark ring, most obviously when the camera pans and the shading stays put while the scene moves.
- On the scopes: heavy grain thickens the Waveform trace into a fuzzy band; a strong vignette makes both ends of the trace droop at the left and right edges of the frame.
- The fix: lower Grain until you notice it only when you look for it, and export at High Quality. For the vignette, keep Amount small and raise Feather so the edge disappears. Toggle it with Bypass to check that it helps. The film look page covers grain in more depth.
Colour grading mistakes cheat sheet
| Mistake | Scope sign | Fix in the studio |
|---|---|---|
| Grading before correcting | Neutrals uneven on the Parade | Balance Correction first |
| Uncalibrated screen, no scopes | None: use the scopes | Pro mode, steady light |
| Crushed or clipped | Flat line at 0 or 100% | Contrast, Blacks, Whites |
| Neon skin, over-saturation | Trace past the 75% targets | Vibrance, Colour boost |
| Teal and orange everywhere | Two opposite lobes | Lower Intensity, Protect skin tones |
| Ignoring skin | Skin off the skin tone line | Tint, Skin qualifier |
| LUT and log | Trace in the middle, or slammed to the edges | Convert once |
| Delivery gamma | None: check the export | Output on Rec.709, test screens |
| Mismatched shots | Different trace heights | Match, then trims |
| Too much grain or vignette | Fuzzy trace, drooping ends | Less Grain, more Feather |
Run down the table before every export. It takes a minute, and it catches problems while they are still easy to fix. The tutorial overview puts each fix in the order it belongs.
Try it: make the mistakes on purpose, then fix them
Push a test clip into three classic mistakes while watching the scopes, so you recognise the signs on your own footage, then fix each one.
- 1
Open a test clip with the scopes
Open a clip with faces and neutral areas, switch to Pro, and show the Waveform and Vectorscope.
- 2
Over-saturate it
In Adjust, push Saturation high and watch the Vectorscope trace pass the 75% targets. Reset it, then try Vibrance instead.
- 3
Crush the blacks
Raise Contrast and lower Blacks until the Waveform flattens at 0%. Set View to Clipping to see where, then undo.
- 4
Push skin off the line
In Looks, apply a strong look at full Intensity and watch the skin lobe leave the skin tone line, then raise Protect skin tones.
- 5
Compare
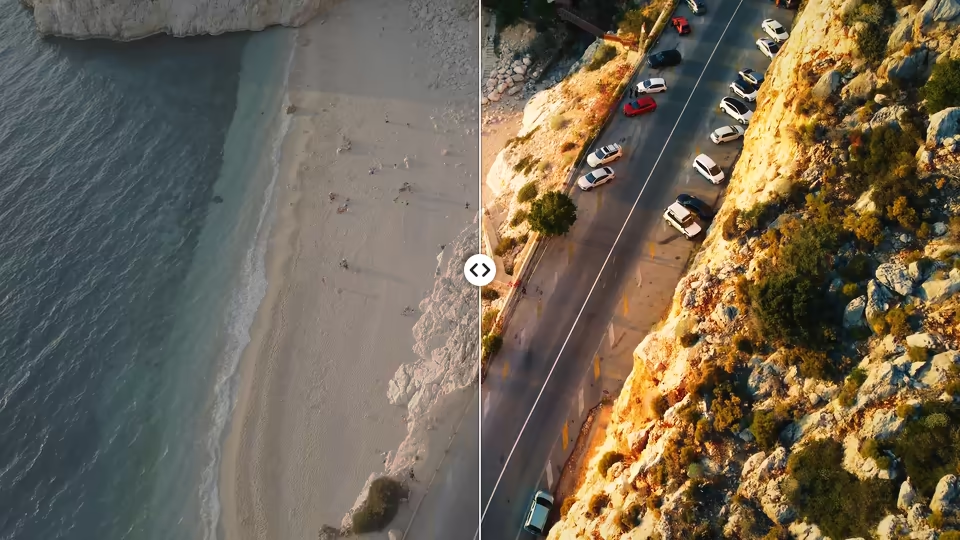
Set Compare to Split to check the fixed grade against the original.
Drop a video or photo to colour gradeChoose a video or photo to grade
Opens in the studio: looks and Auto colour for a quick result, wheels, curves, masks and scopes when you want more.It opens in the studio on your phone. Nothing is uploaded.
MP4, MOV, WebM, MKV, JPG, PNG, WebP
Free · no watermark · graded on your device, never uploaded